
In this post I want to show you step-by-step implementation of SharePoint Framework Command Set Customizer.
Key features of the sample:
- SPFx Command Set Customizer implementation
- Current user permissions check
- construction of url to work on specific item's permissions
Prerequsites
Before following the steps in this article, be sure to proceed next 3 steps:- Get Office Developer Tenant (you can get one for free by subscribing to Office 365 Developer Program. It's an optional step as Extensions reached General Availability but it's good to have the tenant to be able to get preview versions in future.
- Set up your development environment
General Information
Customizer Purpose
- Insert custom commands to Lists’ command bar
- Insert custom commands to List Items’ context menu (ECB)
Entry Points
- onInit() – runs code before page DOM is ready. Perform needed setup here
- onListViewUpdated(IListViewCommandSetListViewUpdatedParameters) – occurs whenever the application attempts to display it in the UI (for example, when user selects items in the list view)
- onExecute(IListViewCommandSetExecuteEventParameters) – defines what happens when a command is executed
Helpful APIs
- this.properties – properties that are passed to the customizer
- this.context.pageContext – standard definitions for common SharePoint objects (site, web, user, list, etc.)
- this.context.httpClient, this.context.spHttpClient, this.context.graphHttpClient – helpers to send http requests, http requests with SharePoint context and Microsoft Office Graph requests
- this.context.listView – information about current List View
- event.itemId – identifier of executed command (available in onExecute method)
- event.selectedRows - list of currently selected rows in the view. Available in onListViewUpdated and onExecute methods
- Command - entity of the command. Contains command's editable properties (title, visible, etc.). The entity can be requested with this.tryGetCommand('COMMAND_ID')
Scaffolding the Project
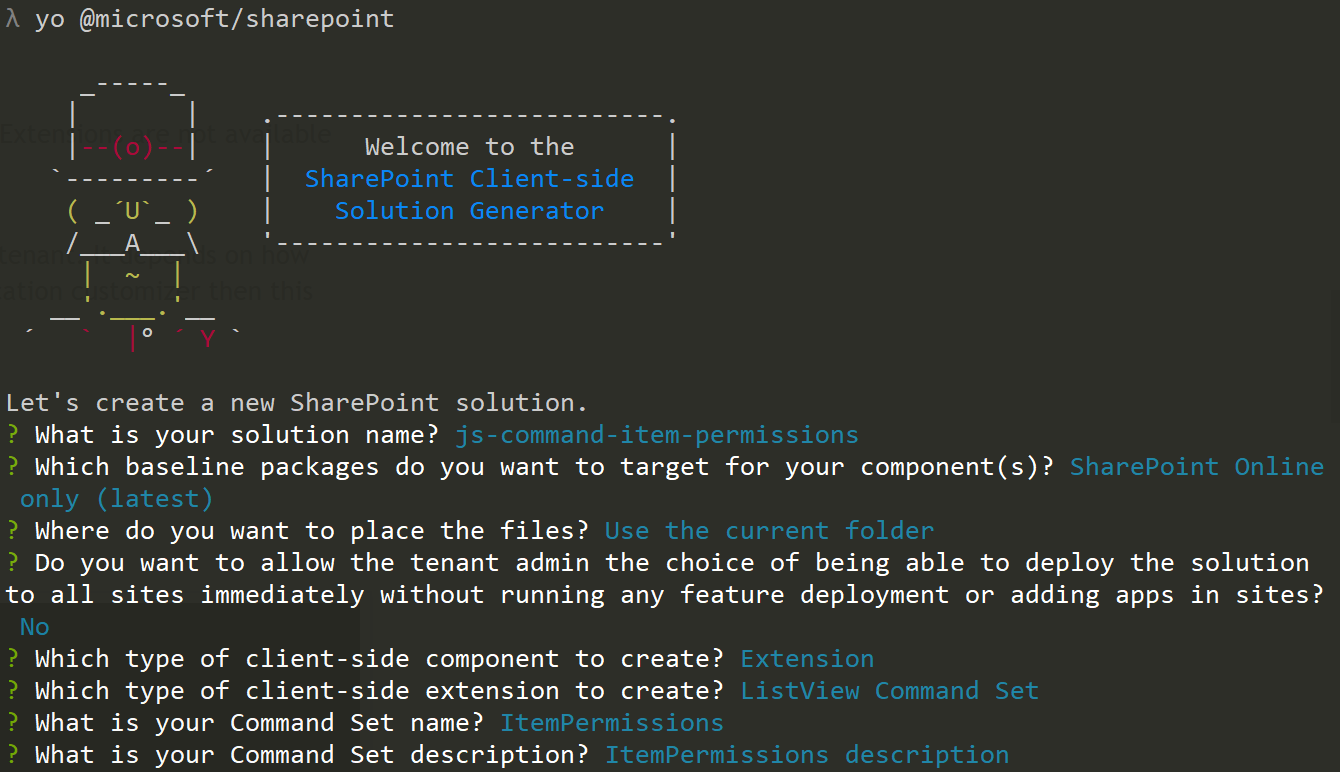
First step in any SPFx project is to "scaffold" it using Yeoman SharePoint Generator. "Scaffold" in more classic terms means generate or create from a template.Here are the steps to create a project.
- Open Command Prompt (Terminal in MacOS) or any Console tool
- Create a new directory for the project in the location you want
mkdir js-command-item-permissions - Go to the created directory
cd js-command-item-permissions - Start scaffolding new project with Yeoman SharePoint Generator
yo @microsoft/sharepoint - When prompted
- Accept default solution name (js-command-item-permissions)
- For baseline packages select SharePoint Online only (latest) as SPFx Extensions are not available for SharePoint 2016
- Select Use the current folder
- You can select either y or N for availability of your extension across tenant. It depends on how you're going to install it. If you use Feature Framework to add application customizer then this option will not work as it doesn't work with Feature Framework
- Select Extension as a client-side component
- Select List View Command Set as an extension type
- Type ItemPermissions as a name
- Accept default description
- Wait until Yeoman is installing all needed dependencies
 Congratulations! The project has been scaffolded! Now you can open the project in favorite IDE.
 Note: this is a TypeScript project so select the IDE that supports TypeScript language. I'm using Visual Studio Code.
The project structure should look like the one on the picture below

Debugging the Extension using gulp serve and query string
I decided to put this section at the beginning so you could run the code each time you want to check if everything works fine.SharePoint Framework extensions cannot currently be tested using the local workbench, so you'll need to test and develop them directly against a live SharePoint Online site. You do not however need to deploy your customization to the app catalog to do this, which keeps the debugging experience simple and efficient. First, compile your code and host the compiled files from the local machine by running this command:
gulp serve --nobrowserIf the code compiled without errors the server will be running on http://localhost:4321.
To test the extension
- Go to SharePoint tenant
- Open any list/document library
- Append next query string parameters to the list's URL:
Where:
?loadSPFX=true&debugManifestsFile=https://localhost:4321/temp/manifests.js&customActions={"fc875dc3-2180-4f1b-bc1c-a20d8ece961b":{"location":"ClientSideExtension.ListViewCommandSet"}}- loadSPFX=true ensures that the SharePoint Framework is loaded on the page. For performance reasons, the framework is not normally loaded unless at least one extension is registered. Since no components are registered yet, we must explicitly load the framework.
- debugManifestsFile=<URL> specifies that we want to load SPFx components that are being locally served. Normally the loader only looks for components in the App Catalog (for your deployed solution) and the SharePoint manifest server (for the system libraries).
- customActions simulates Custom Action. The Key here specifies the GUID of the extension that should be loaded - ID value is located in manifest.json file of the extension. Location parameter should be
- ClientSideComponent.ListViewCommandSet to add commands both to Command Bar and Item Context Menu
- ClientSideComponent.ListViewCommandSet.CommandBar to add commands to Command Bar only
- ClientSideComponent.ListViewCommandSet.ContextMenu to add commands to Item Context Menu only
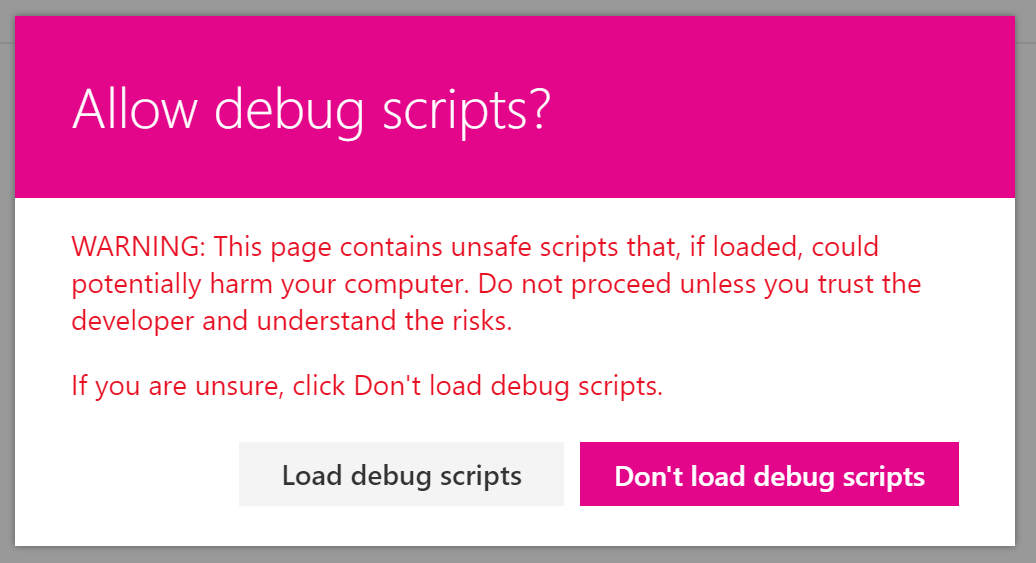
https://terentiev.sharepoint.com/Lists/Slider%20Test/AllItems.aspx?loadSPFX=true&debugManifestsFile=https://localhost:4321/temp/manifests.js&customActions={"fc875dc3-2180-4f1b-bc1c-a20d8ece961b":{"location":"ClientSideExtension.ListViewCommandSet"}} - Accept loading of Debug Manifests
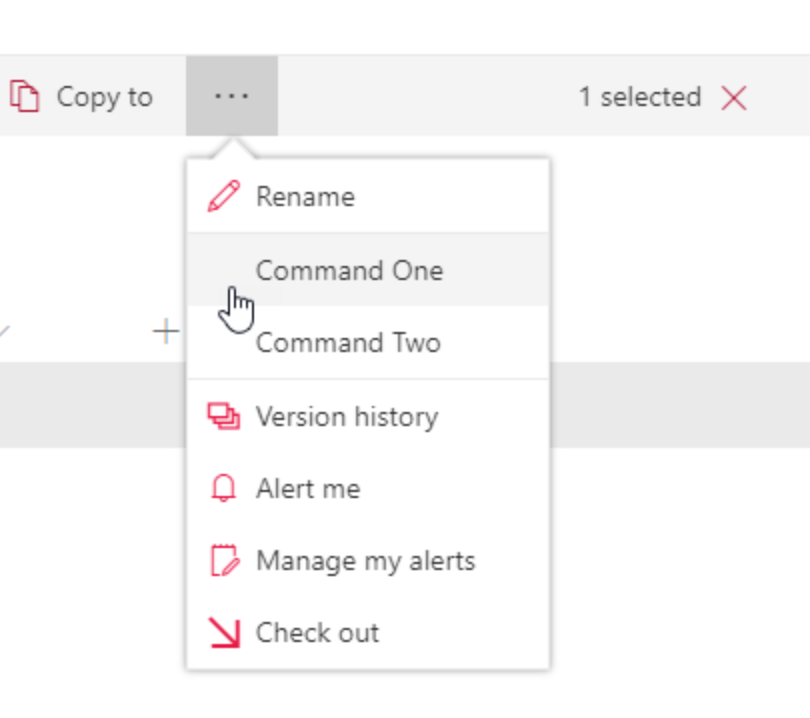
- You should buttons added to List's command bar
Configuring Command's Identifier and Title
Next step is to change auto-generated identifiers and titles for the commands in the customizer.By default, Yeoman generator adds 2 commands in the customizer. But in this example we need only one.
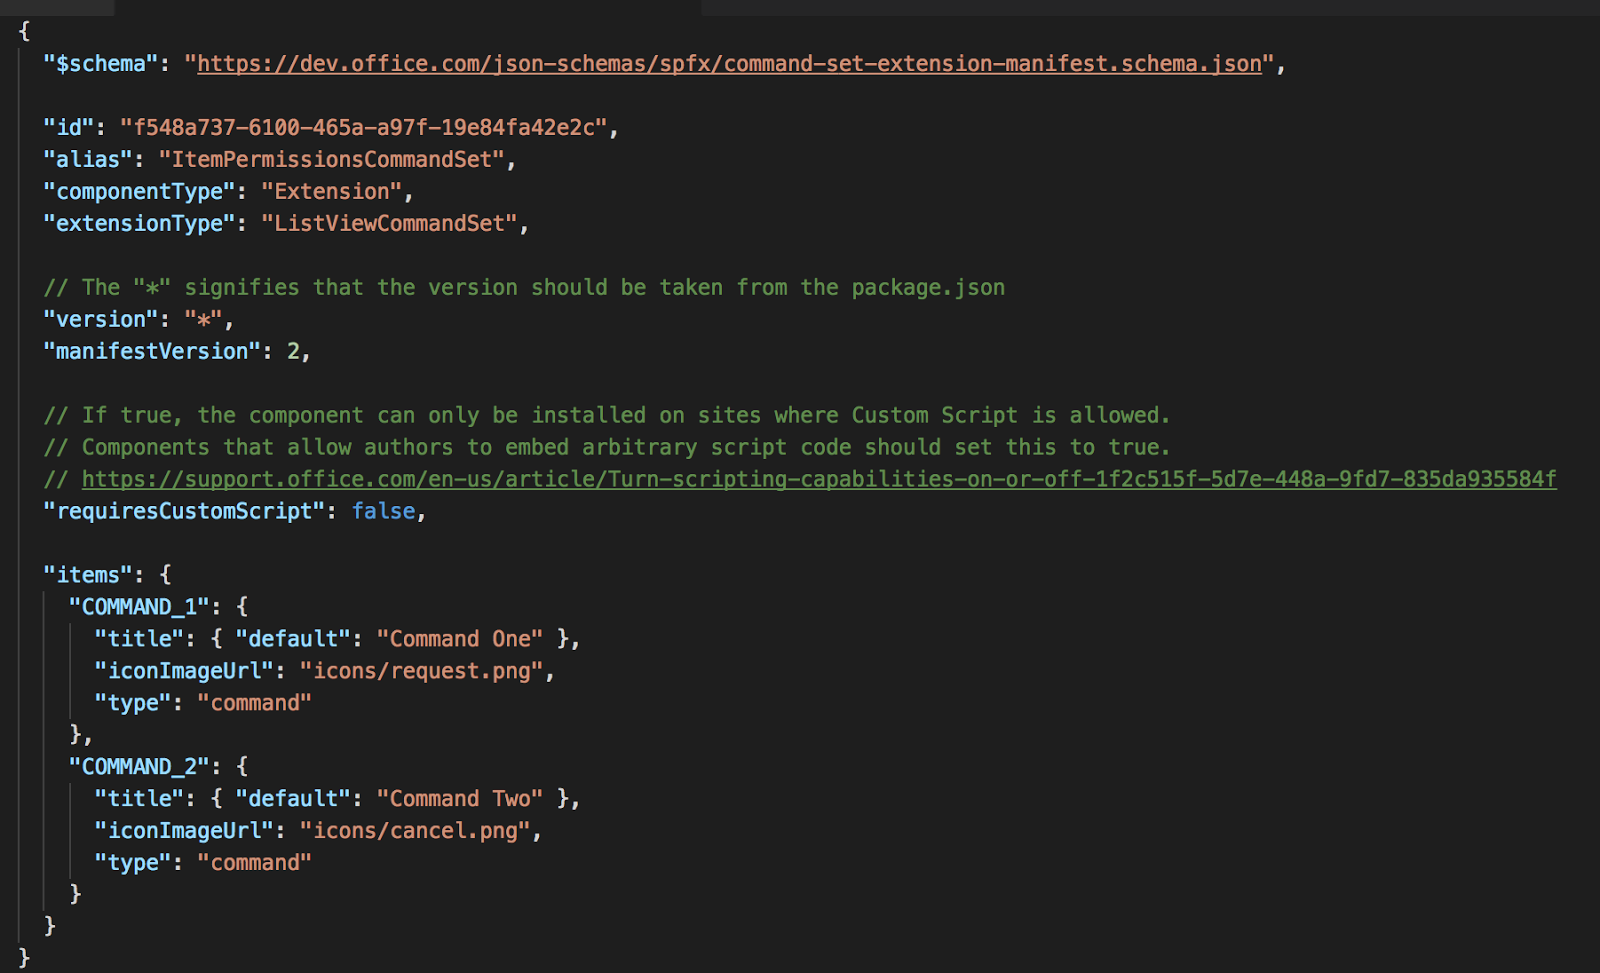
Commands definitions are stored in .manifest.json file in the same location where the customizer's source code is located.
Default content of the file is shown below:
Let's remove default commands' definition and add command with Id ITEM_PERMISSIONS and default title Set item permissions.
iconImageUrl may reference any image address that is available from the tenant. For this example let's just type "fake.png"
Note: for now there is no possibility to use font icons (for example, Office UI Fabric typography for Command Set commands' icons.
Updated .manifest.json file content should look like that:
{
  "$schema": "https://dev.office.com/json-schemas/spfx/command-set-extension-manifest.schema.json",

  "id": "fc875dc3-2180-4f1b-bc1c-a20d8ece961b",
  "alias": "ItemPermissionsCommandSet",
  "componentType": "Extension",
  "extensionType": "ListViewCommandSet",

  // The "*" signifies that the version should be taken from the package.json
  "version": "*",
  "manifestVersion": 2,

  // If true, the component can only be installed on sites where Custom Script is allowed.
  // Components that allow authors to embed arbitrary script code should set this to true.
  // https://support.office.com/en-us/article/Turn-scripting-capabilities-on-or-off-1f2c515f-5d7e-448a-9fd7-835da935584f
  "requiresCustomScript": false,

  "items": {
    "ITEM_PERMISSIONS": {
      "title": { "default": "Set item permissions" },
      "iconImageUrl": "fake.png",
      "type": "command"
    }
  }
}
Configure command's UI behavior when ListView is refreshed
As I mentioned above, there is a onListViewUpdated(IListViewCommandSetListViewUpdatedParameters) event that occurs separately for each command (for example, a menu item) whenever a change happens in the List View, and the UI needs to be re-rendered. It can be used to determine if the command should be displayed and even its title.In this example the command works with single item permissions. It means that it should be visible if 2 conditions were fulfilled:
- Current user has rights to manage permissions
- Exactly one row is selected in the List View
const compareOneCommand: Command = this.tryGetCommand('ITEM_PERMISSIONS');this.context.pageContext.list.permissions.hasPermission(SPPermission.managePermissions)Finally, amount of selected rows could be received as event.selectedRows.length
Full code of onListViewUpdated is listed below
const compareOneCommand: Command = this.tryGetCommand('ITEM_PERMISSIONS');
if (compareOneCommand) {
  // This command should be hidden unless exactly one row is selected.
  compareOneCommand.visible = this.context.pageContext.list.permissions.hasPermission(SPPermission.managePermissions)
    && event.selectedRows.length === 1;
}
Executing the command
The final part of the implementation is command's execution. onExecute method is used to define the command's logic.First this to do in this method is to check what command was executed (it is an optional step in scenario when a command set customizer has only one command definition, but necessary if there are 2 or more commands. That's why I would recommend to make this check in any command set):
switch (event.itemId) {
  case 'ITEM_PERMISSIONS':
// command's logic goes here- List - list's ID. Braces should be "escaped" with %7B and %7D
- obj - defines the object in the list that will be changed. It should contain list ID, item ID and LISTITEM word separated by comma
const listId = this.context.pageContext.list.id;
window.open(`${this.context.pageContext.web.absoluteUrl}/_layouts/15/user.aspx?List=%7B${listId}%7D&obj=%7B${listId}%7D,${event.selectedRows[0].getValueByName('ID')},LISTITEM`, '_blank');@override
public onExecute(event: IListViewCommandSetExecuteEventParameters): void {
switch (event.itemId) {
case 'ITEM_PERMISSIONS':
const listId = this.context.pageContext.list.id;
window.open(`${this.context.pageContext.web.absoluteUrl}/_layouts/15/user.aspx?List=%7B${listId}%7D&obj=%7B${listId}%7D,${event.selectedRows[0].getValueByName('ID')},LISTITEM`, '_blank');
break;
default:
throw new Error('Unknown command');
}
}Deployment
Deployment of any SharePoint Framework solution is done similarly to the deployment on SharePoint Add-ins:- Package the solution
- Deploy the solution to App Catalog
- Install the app to the specific site
gulp bundle --ship
gulp package-solution --ship
The second one will create .sppkg file in solution_folder/sharepoint folder and also prepare all the assets to be deployed to some storage. It may be Office 365 CDN, Azure Storage or any other type of public or organization storage. Preparation of the storage is a large separate topic. You can read about Office 365 CDN here and about Azure CDN here.
After the solution is packaged and the assets are deployed to some CDN the solution can be deployed (manually or using some custom routine) to App Catalog and later installed to some site.
By default, the application customizer will be available as soon as the app is installed to the site. If you need some custom logic that will optionally activate the Customizer you can use CSOM/JSOM for that:
- Delete elements.xml in solution_folder/sharepoint/assets
- Remove feature from package-solution.json that references elements.xml
- Deploy the solution to App Catalog and install on the site
- Get Web CustomActions collection:
var ctx = new ClientContext("web_url"); var web = ctx.Web; var list = web.Lists.GetByTitle('My List'); var customActions = list.UserCustomActions; - Add new CustomAction with correct ClientSideComponentId and ClientSideComponentProperties: var ca = customActions.Add(); ca.ClientSideComponentId = new Guid("customzier_id"); ca.ClientSideComponentProperties = "customizer_props"; ca.Title = "List View Command Set Customizer Title"; ca.Location = "ClientSideExtension.ListViewCommandSet"; ca.Update(); list.Update(); ctx.ExecuteQuery();
And that's it!
Now you should be ready to create your Application Customizers, debug them and deploy. You can get the code from GitHub repo
Have fun!
Comments