

This blog post is a step-by-step instruction on how to create a Bot from scratch using Microsoft Bot Framework v4, configure it to work with Microsoft Teams, and authenticate it to make Microsoft Graph requests.
There are a lot of resources around bots, authentication in bots and Microsoft Teams (and I'll list resources at the end of the post). But during my investigation I couldn't find an example or an article that walks through all 3 topics at the same time. And especially "from scratch" which is important if you want to understand the technology and the flow.
So this post is kind of a cheat sheet for myself, and hopefully for others.
All the steps described are for Bot Framework v4 and ASP.NET Core.
Code is available here.
Keep in mind that except of code there are different configurations to be done in Azure and MS Teams.
So, it might worth reading the post.
Table of Contents
- Prerequisites
- What to Install
- Create Empty Bot
- Prepare Azure Resources
- Set AppId and App Password in Bot's Configuration
- Deployment
- Test the Bot in Bot Framework Emulator
- Connecting the Bot with Microsoft Teams
- State and Dialogs
- Authentication Time!
- Add MS Graph Logic
- Next Steps
- References
- Conclusion
Prerequisites
The bot to be created will be registered and hosted in Azure, work with Microsoft Graph from Microsoft Teams, and implemented using ASP.NET Core...Saying all that the prerequisites are:
- O365 Tenant
- Azure Subscription with Azure Bot Service, App Service
- Visual Studio
What to Install
Create Empty Bot
- Open Visual Studio to create a new project
- Select "Empty Bot (Bot Framework v4)" project type
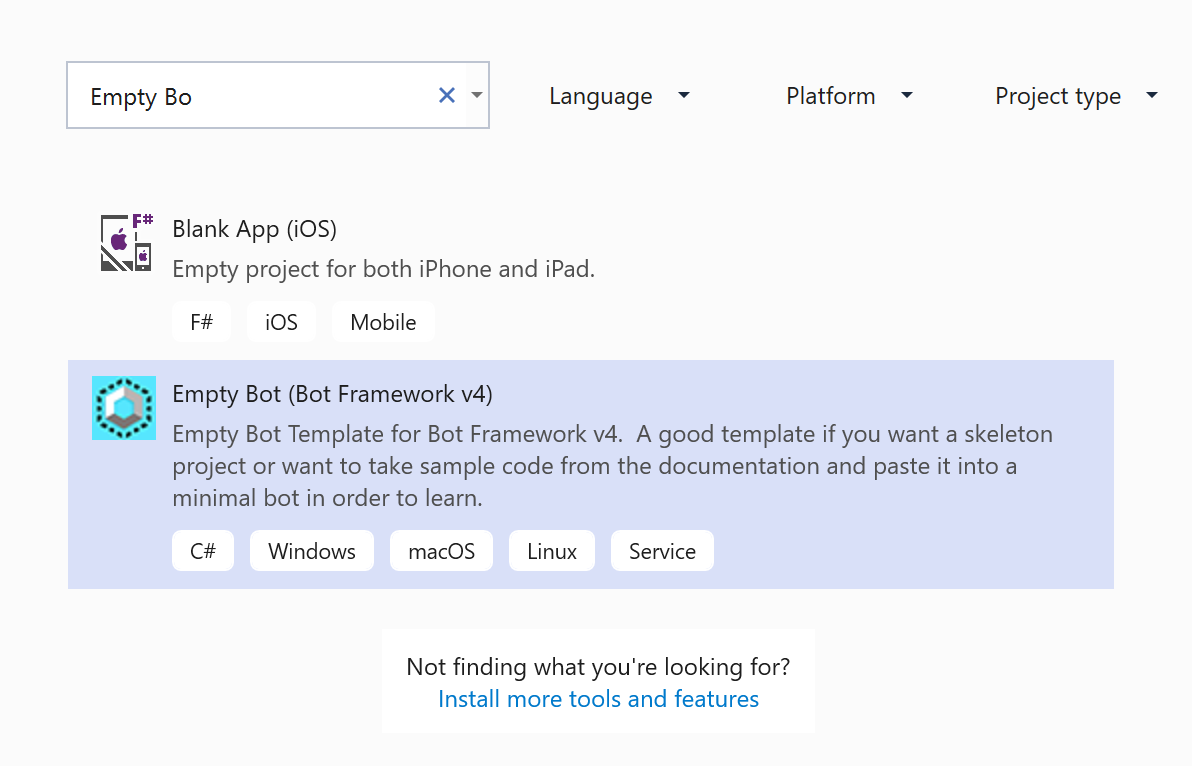
- Type a name for the project, and select a folder. I'll be using TeamsGraphBot name
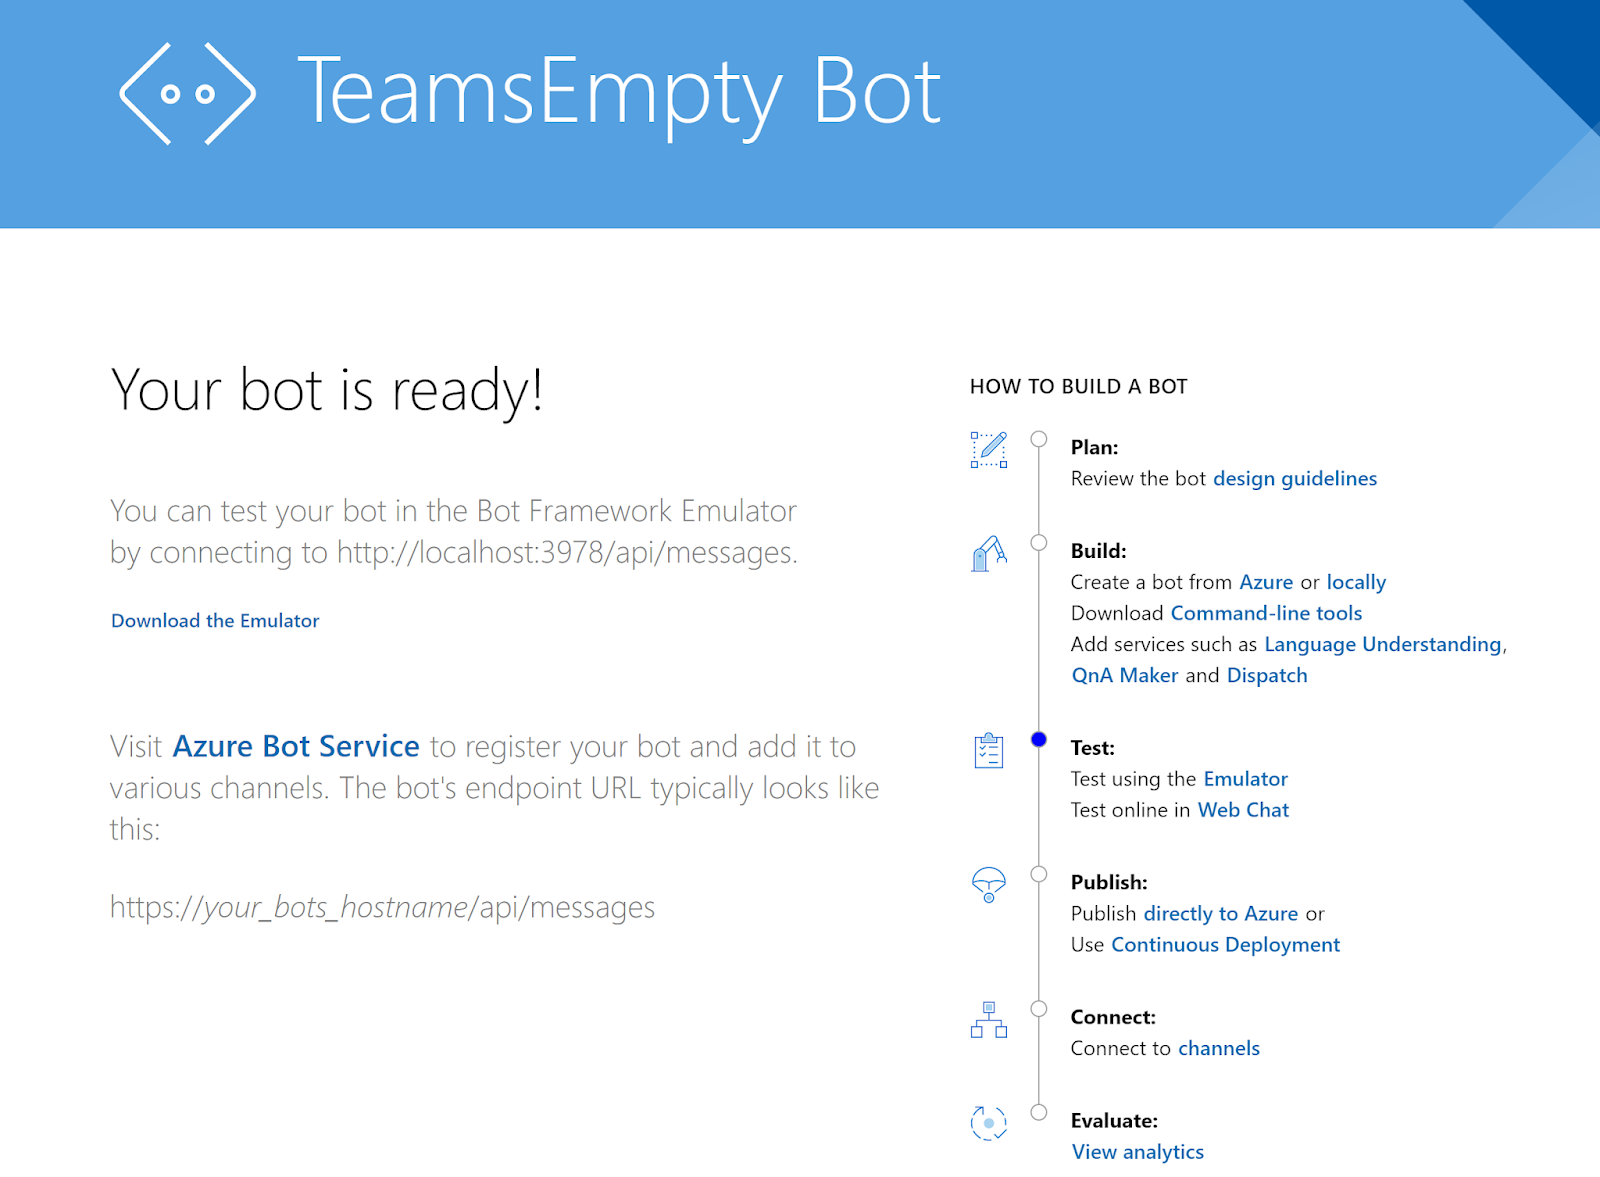
If you start the project (F5 in Visual Studio). You'll see a web page illustrating how to test the bot.
Prepare Azure Resources
Official documentationLogin and Connect to Azure Subscription
- Open command prompt
- Enter the command below to log in to Azure Portal:
It will open a browser window, allowing you to log in.
az login - Next, set the subscription to use:
If you are not sure which subscription to use for deploying the bot, you can view the list of subscriptions for your account by using az account list command.
az account set --subscription "<azure-subscription-id>"
Register Azure AD Application
Next step is to register Azure AD App. It can be done either using Azure CLI as described in the documentation listed above, or using Azure Portal.For Azure CLI registration use the command below:
az ad app create --display-name "displayName" --password "AtLeastSixteenCharacters_0" --available-to-other-tenants- displayName is a name for the application,
- password is a 'client secret'.The password must be at least 16 characters long, contain at least 1 upper or lower case alphabetical character, and contain at least 1 special character
- available-to-other-tenants defines that the application can be used from any Azure AD tenant. This must be true to enable your bot to work with the Azure Bot Service channels.
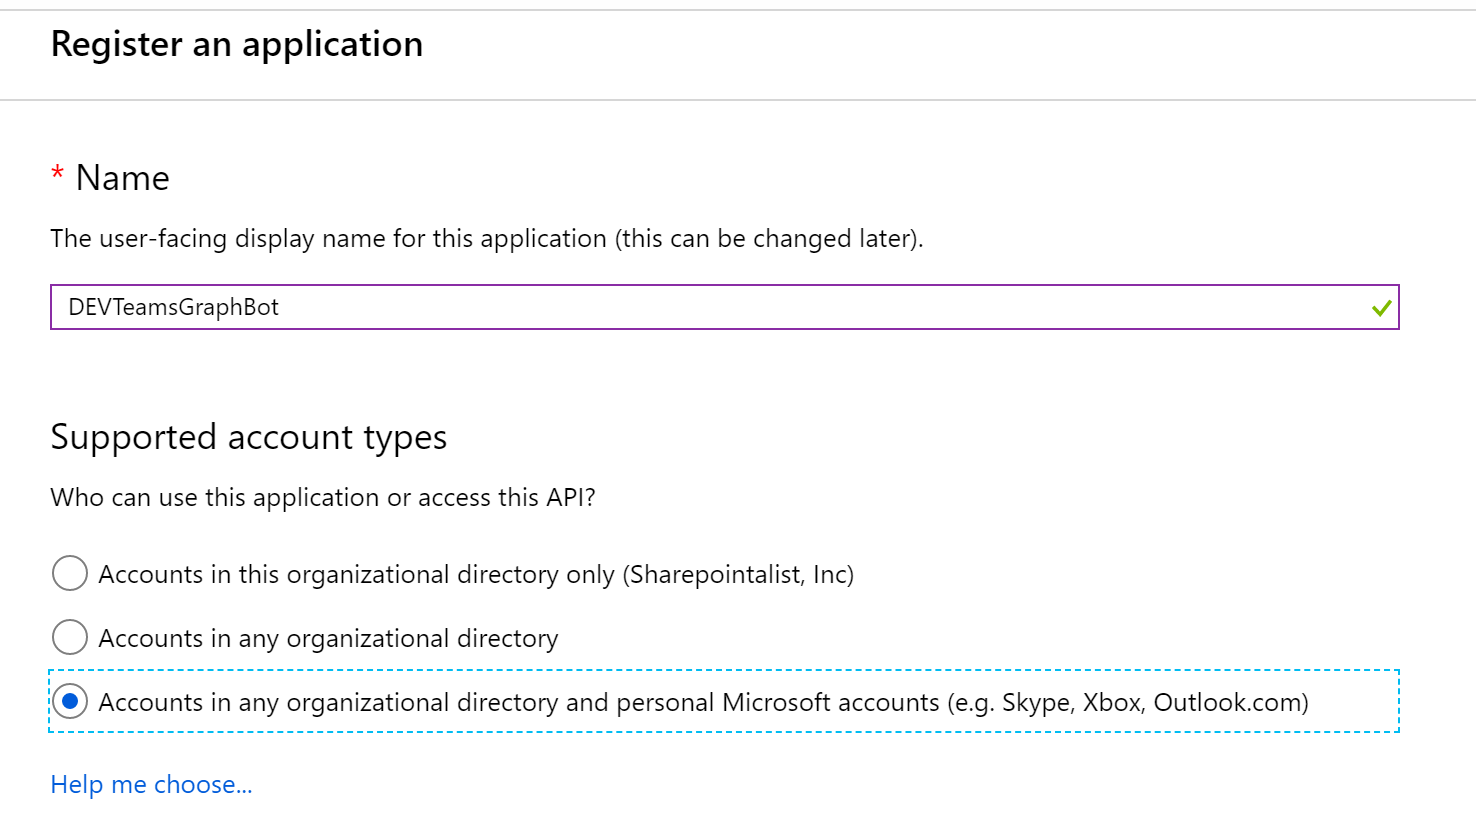
If you go with Azure Portal UI, do the next things while registering the App:
- When registering the app, select Account in any organizational directory and personal Microsoft accounts (e.g. Skype, Xbox, Outlook.com):
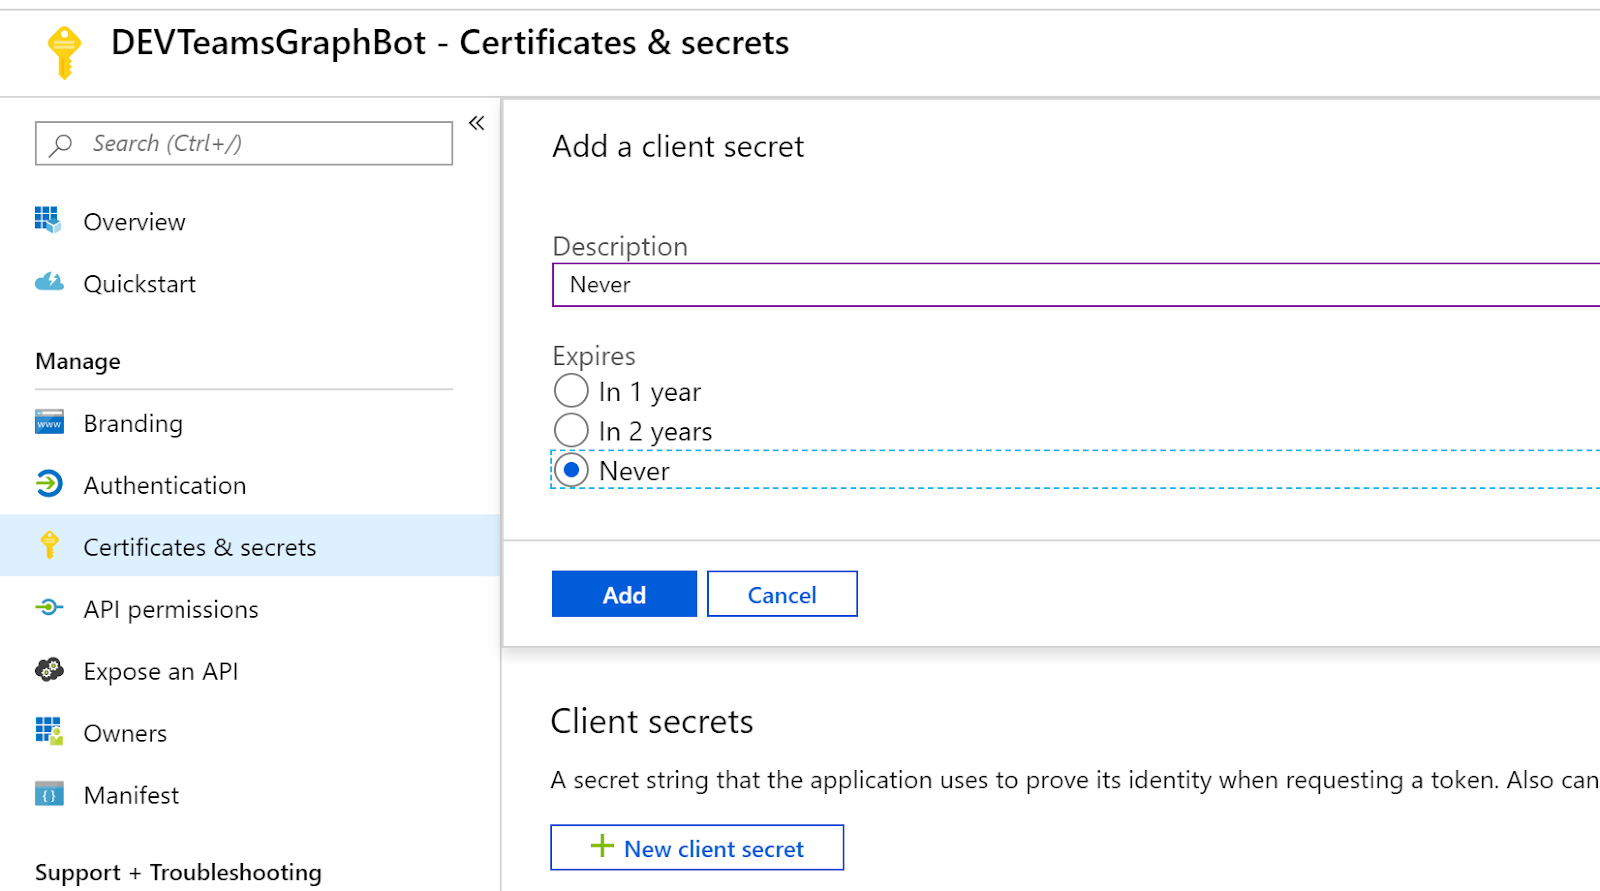
- Navigate to Certificates & secrets, create new client secret that never expires, and store it somewhere:
Create Azure Resources
The bot can be deployed in a new or existing Azure resource group. I will use new group here.To create all bot resources in new resource group:
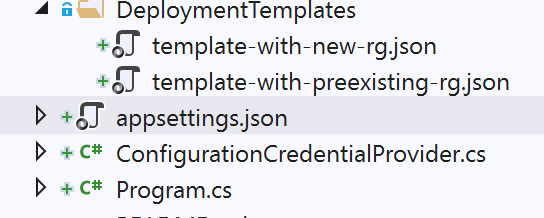
- In command prompt navigate to DeploymentTemplates folder inside the bot project
- Run the command below:
where
az deployment create --name "<name-of-deployment>" --template-file "template-with-new-rg.json" --location "location-name" --parameters appId="<appId>" appSecret="<appSecret>" botId="<id-or-name-of-bot>" botSku=F0 newAppServicePlanName="<name-of-app-service-plan>" newWebAppName="<name-of-web-app>" groupName="<new-group-name>" groupLocation="<location>" newAppServicePlanLocation="<location>"- name - Friendly name for the deployment.
- template-file - The path to the template. We use template-with-new-rg.json file provided in the DeploymentTemplates folder of the project.
- location - Location. Values from: az account list-locations. For example, "West US", or "Central US".
- parameters - Provide deployment parameter values. appId and appSecret values are AppId and Client Secret of the Azure AD App from previous step. The botId parameter should be globally unique and is used as the immutable bot ID. It is also used to configure the display name of the bot, which is mutable. botSku is the pricing tier and can be F0 (Free) or S1 (Standard). newAppServicePlanName is the name of App Service Plan. newWebAppName is the name of the Web App you are creating. groupName is the name of the Azure resource group you are creating. groupLocation is the location of the Azure resource group. newAppServicePlanLocation is the location of the App Service Plan.
Set AppId and App Password in Bot's Configuration
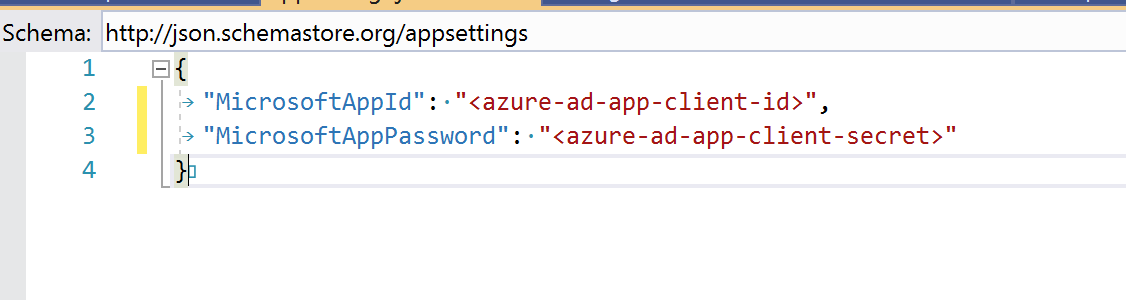
After we prepared all the resources, and to be specific - registered new Azure AD App, we need to set new app's client Id and client Secret in the bot's project settings. These parameters are used to authenticate the bot to communicate with Bot Framework service.- In Visual Studio open appsettings.json file:
- Enter Azure AD App's client Id as MicrosoftAppId value, and client secret as MicrosoftAppPassword value:
Deployment
The deployment can be done using Azure CLI and steps listed in the Official documentation mentioned above.But let's in this sample use old good Azure Publishing Profile.
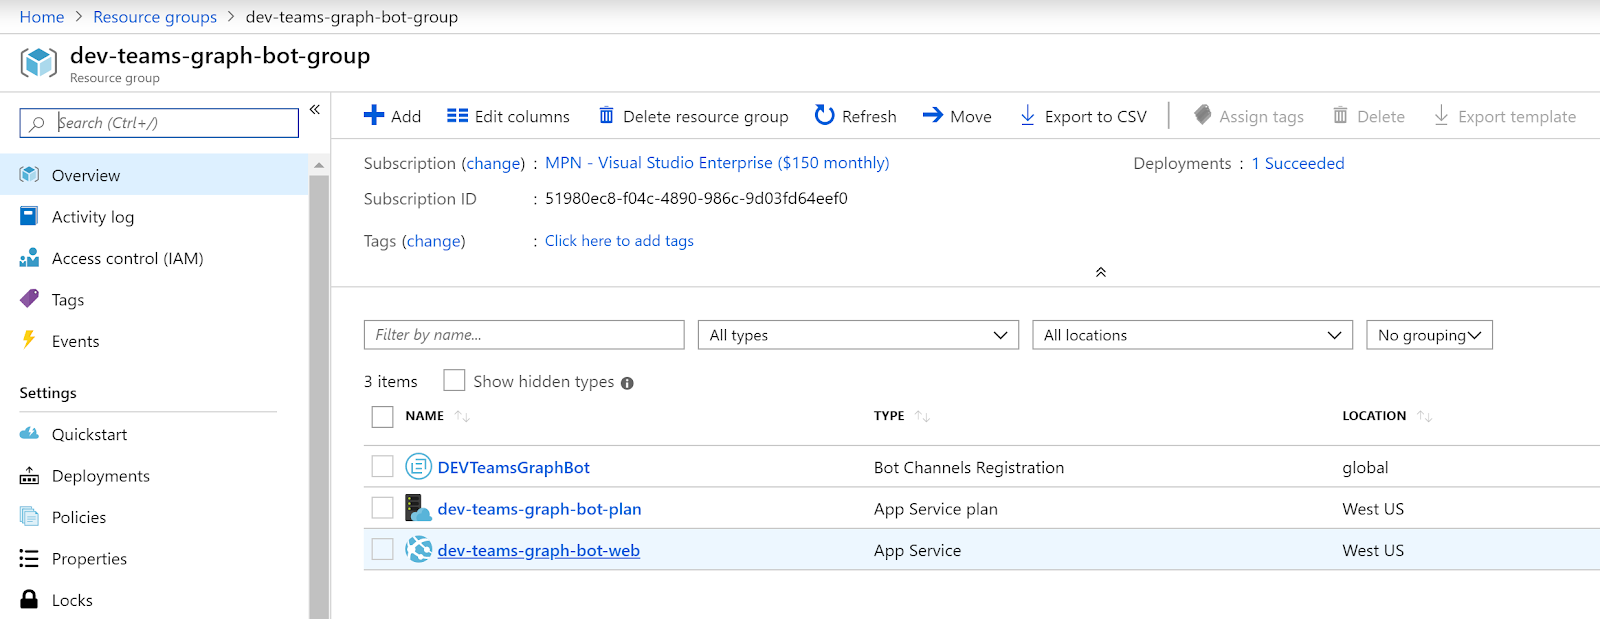
- Navigate to Azure Portal, to the newly created Bot Web App. You can go there either from App Service section, or go to the bot's resource group and start from there:
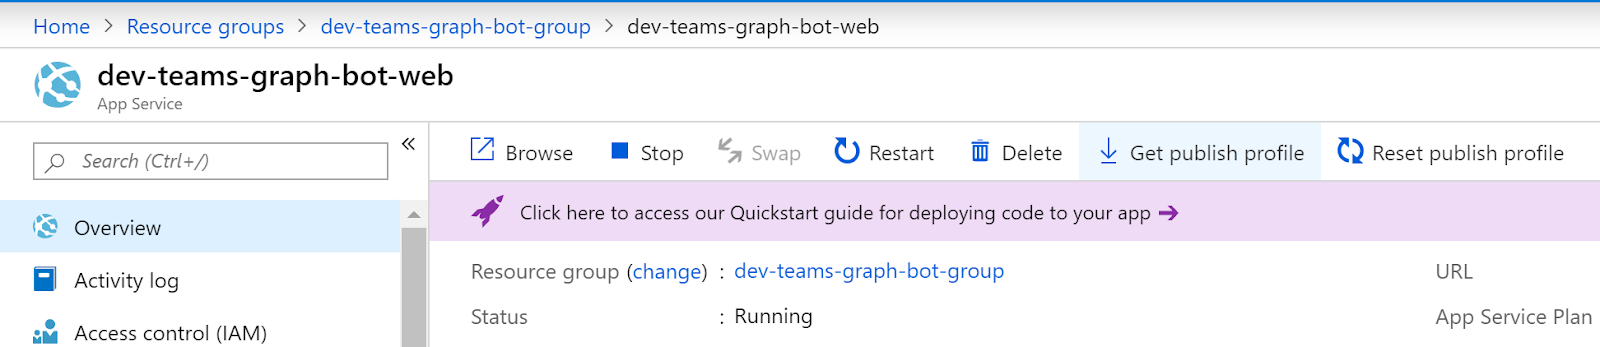
- Click on Get publish profile to download Azure Publishing Profile to your machine:
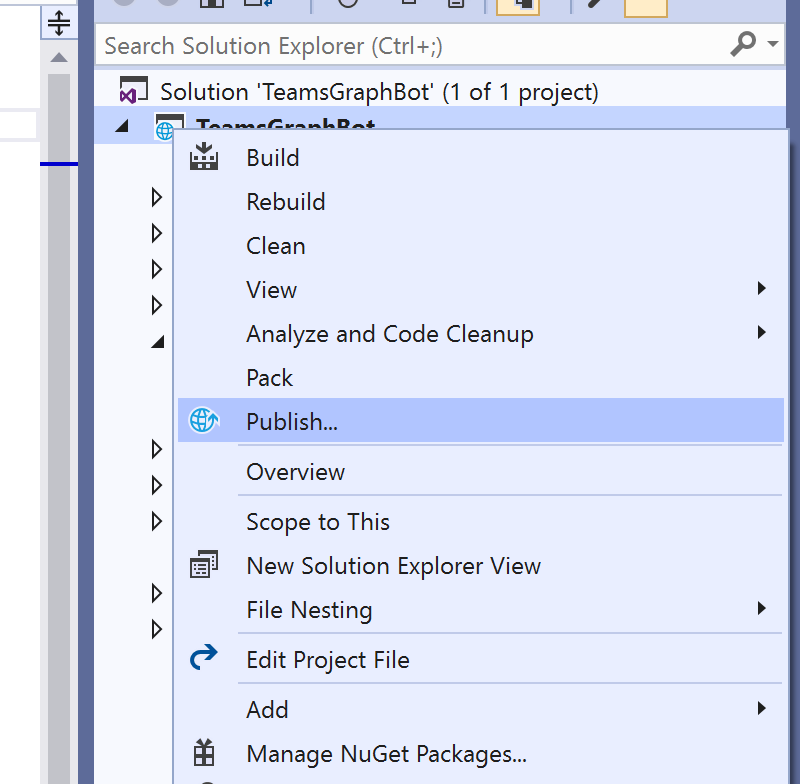
- In Visual Studio right click on the bot's project -> Publish:
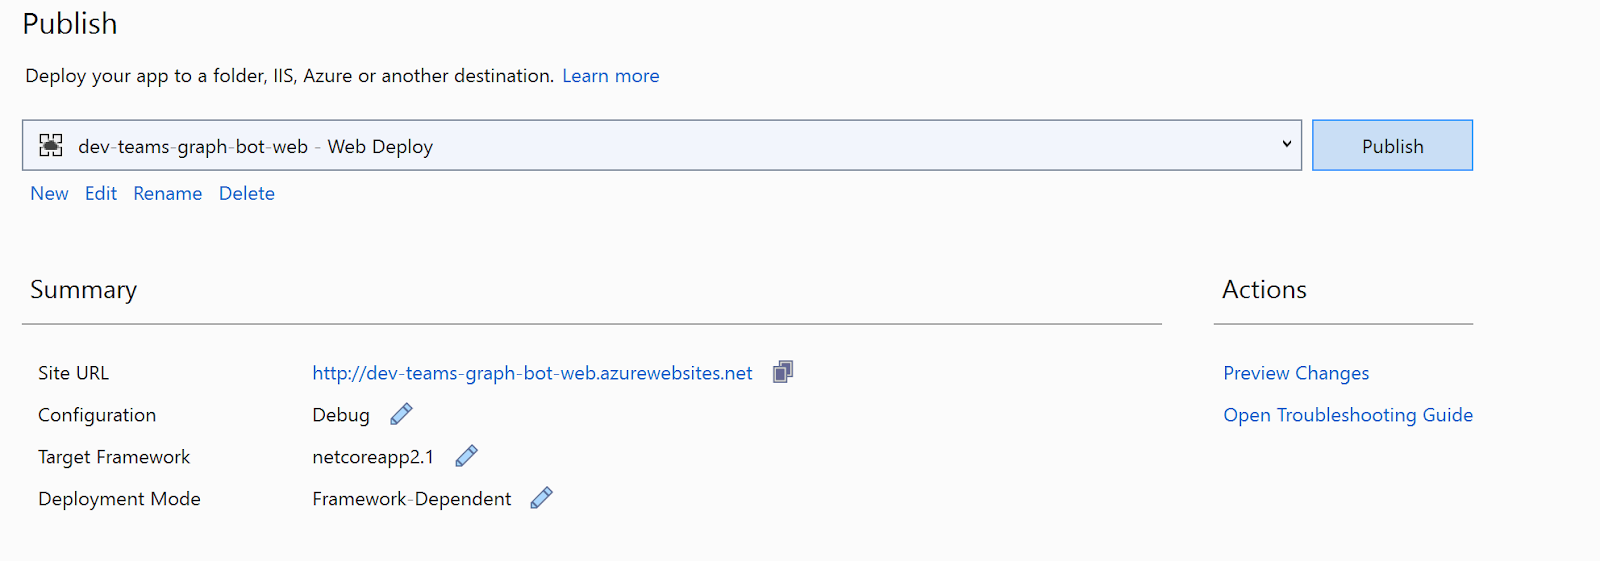
- In the popup click Import Profile... in the bottom left corner:

- Change settings if you wish to. For debugging/development purposes we can change Configuration from Release to Debug.
- Save the changes and click Publish:
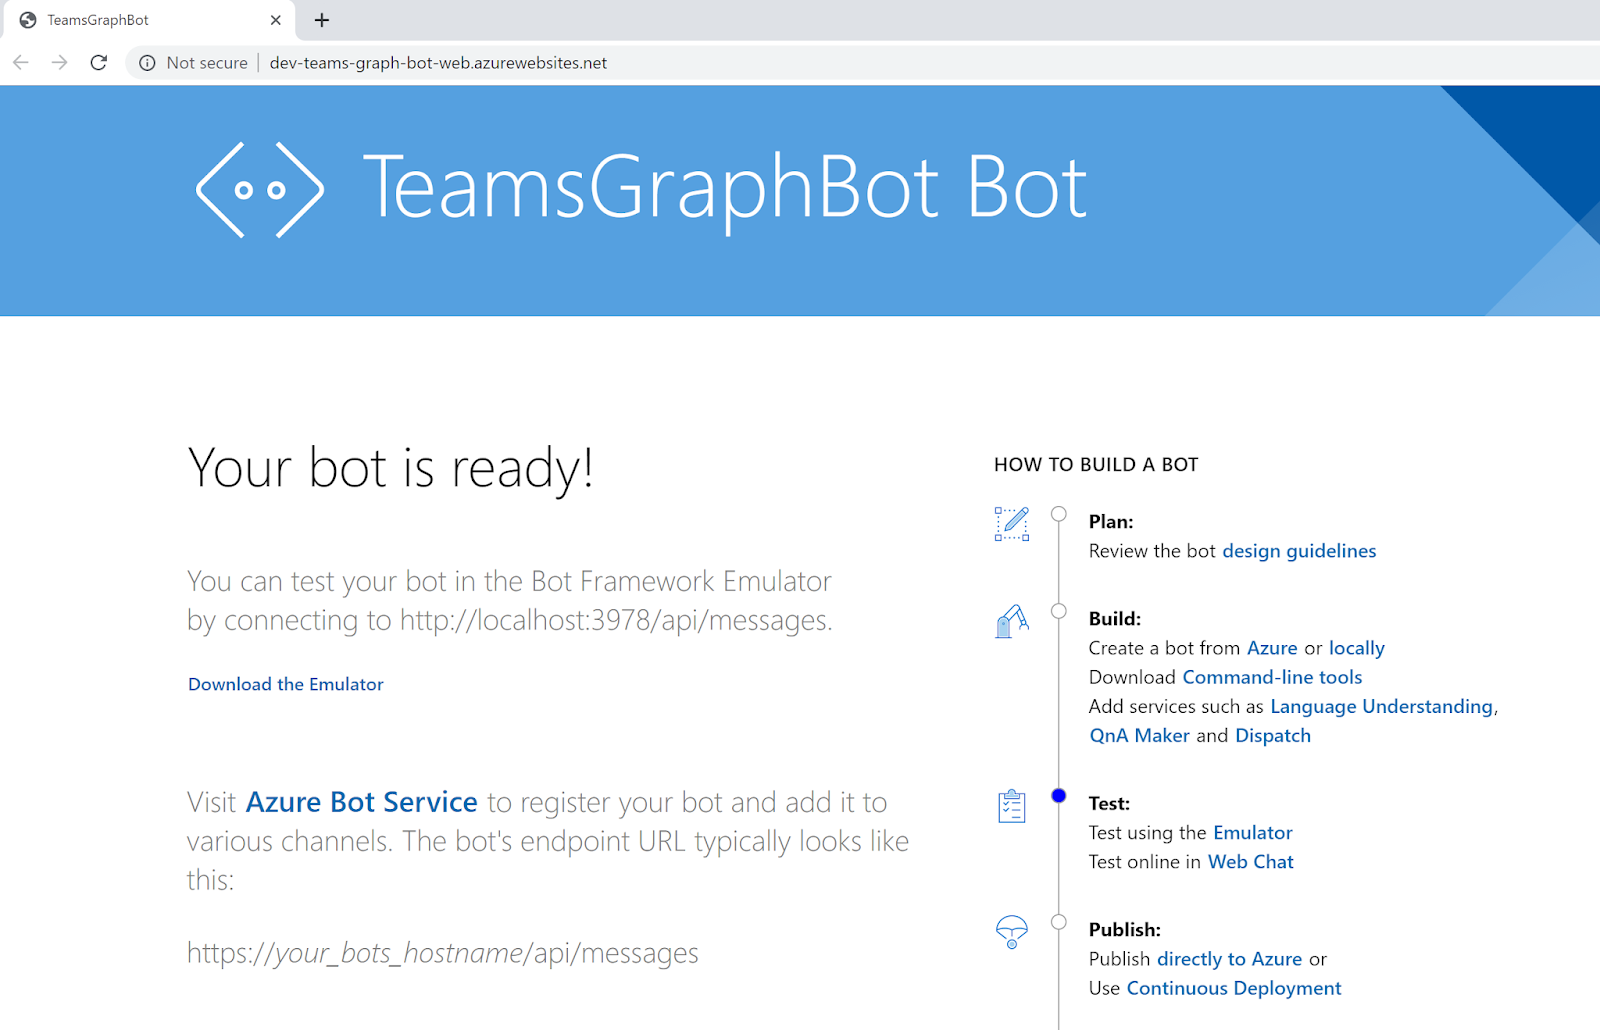
The difference is that now our bot is hosted on Azure.
Test the Bot in Bot Framework Emulator
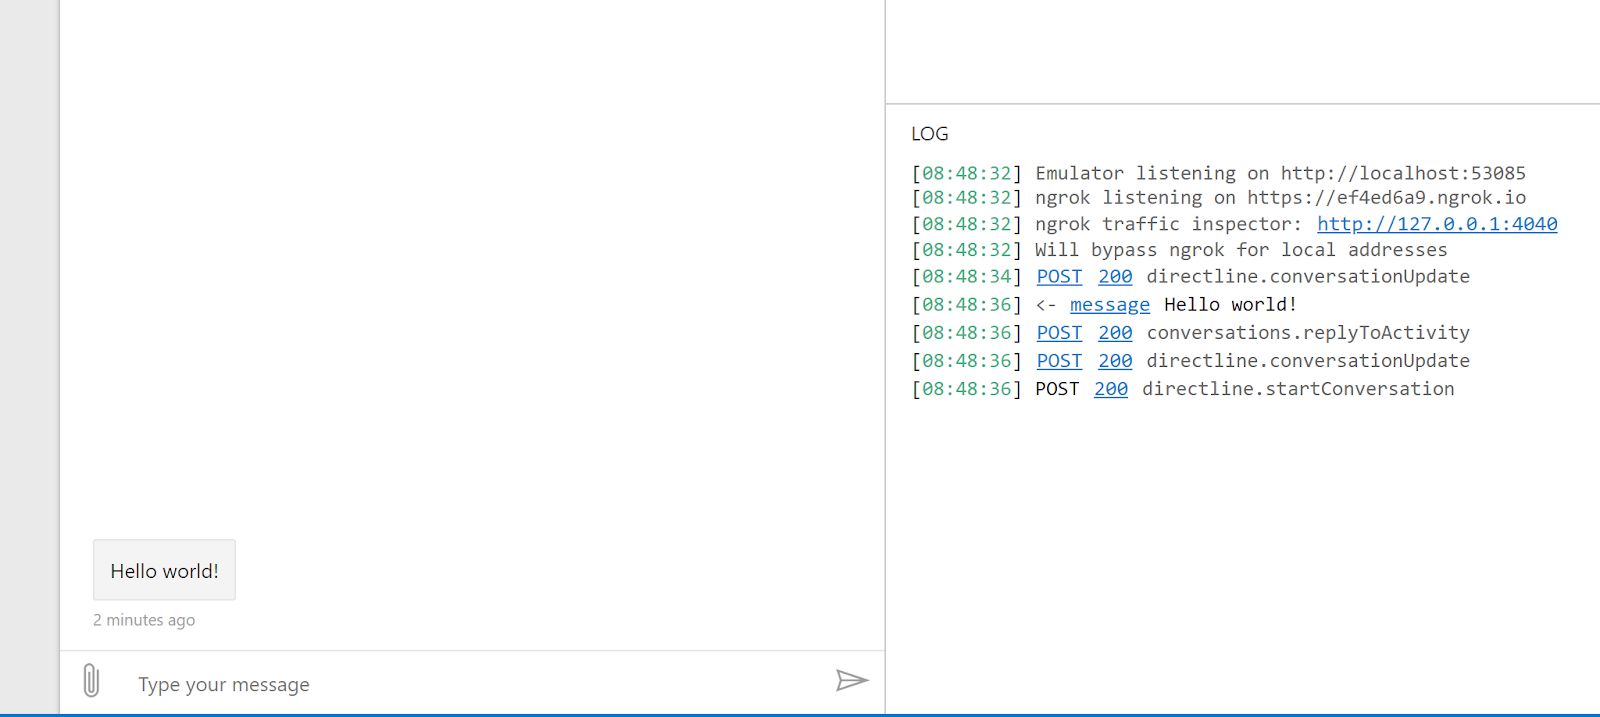
Now we can debug our bot from Bot Framework Emulator.- Start the project (F5 in Visual Studio). You'll see a web page illustrating how to debug the bot.
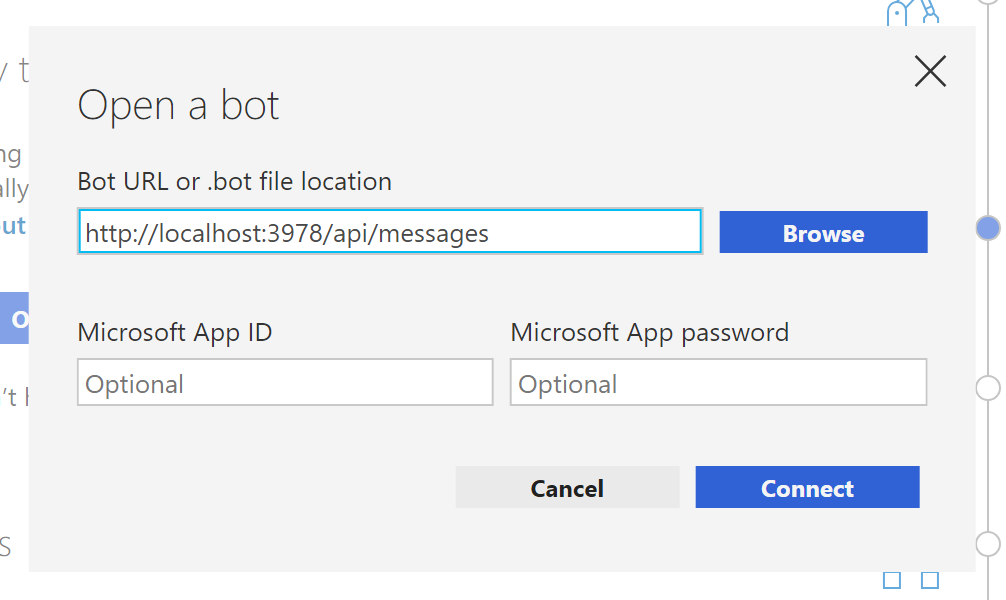
- Copy localhost URL.
- Launch Bot Framework Emulator and click on Open Bot button
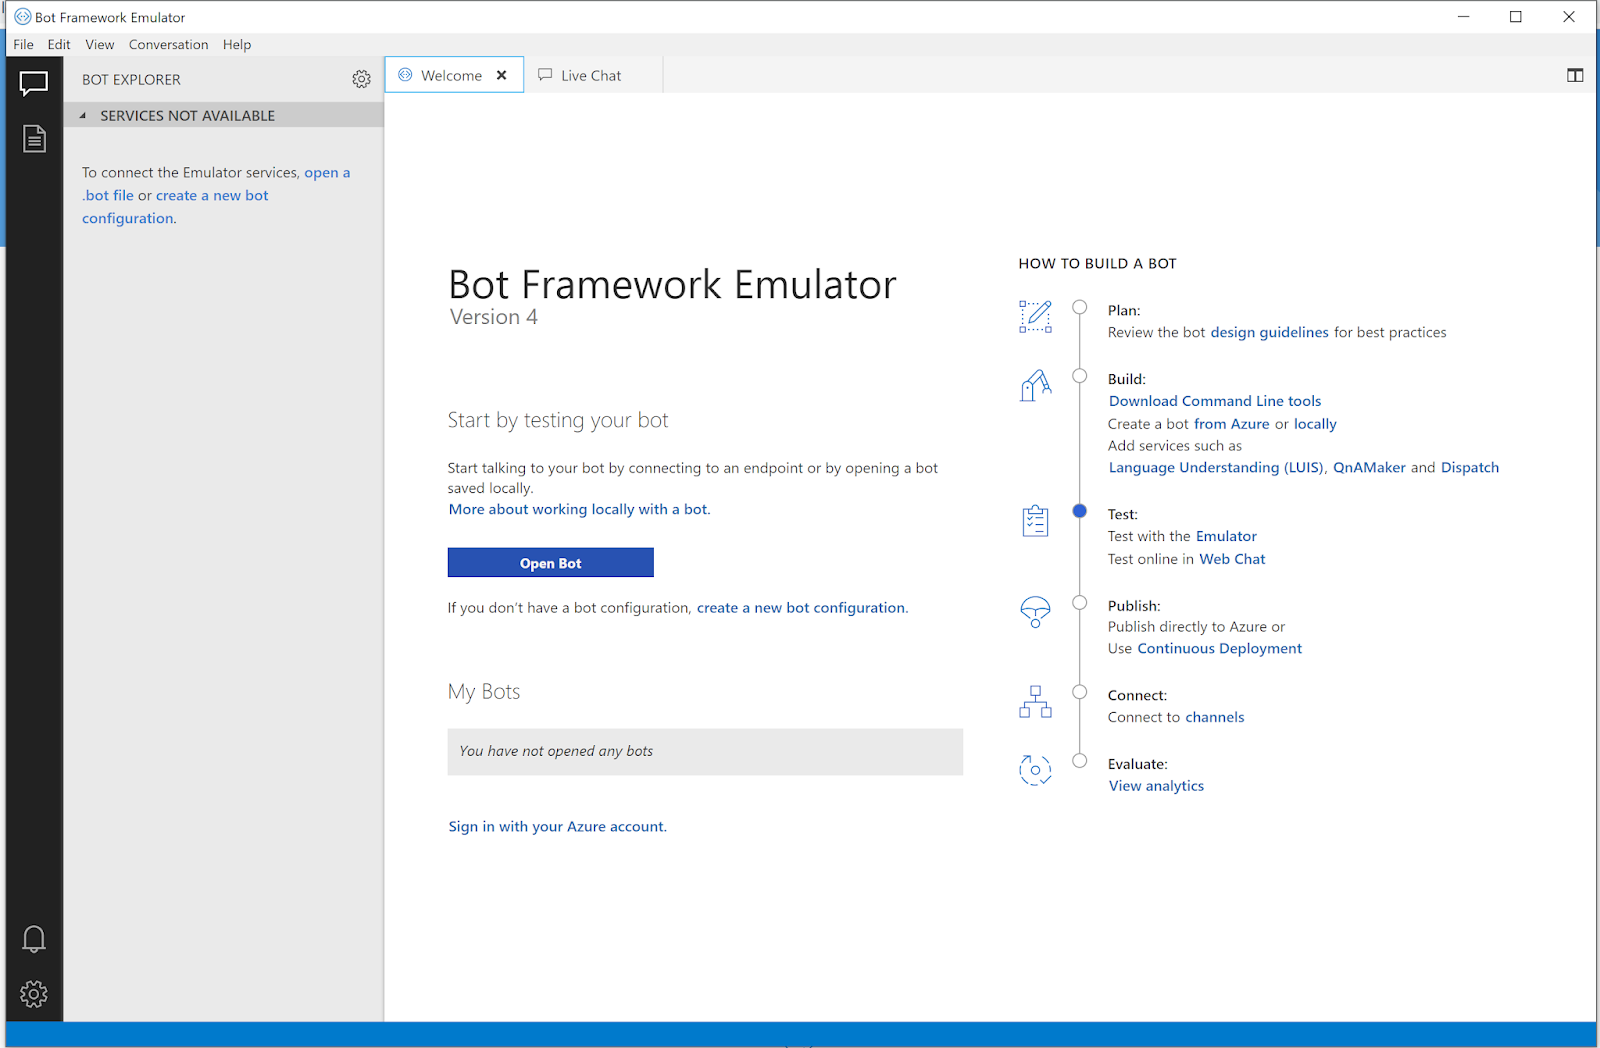
- Enter copied localhost in Bot URL input and hit Connect
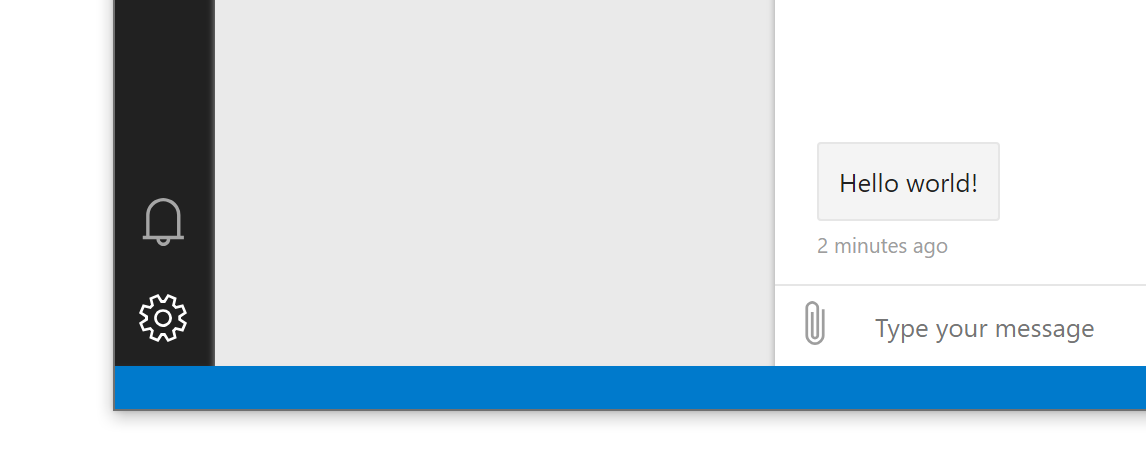
You can test Azure-hosted bot in Bot Framework Emulator as well in the same way: use created App Service web URL instead of localhost. The only additional configuration to be done to allow remote testing in configuring the emulator to use ngrok tunelling.
- Click on cogwheel in left bottom corner of the emulator:
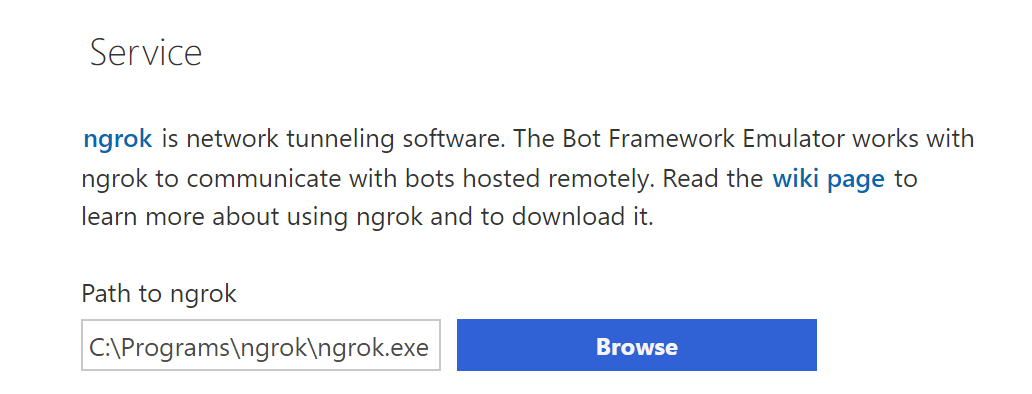
- Provide path to ngrok and click Save. It will allow the emulator to automatically launch ngrok:
Connecting the Bot with Microsoft Teams
Next step is to connect the bot with MS Teams.It can be easily done using Bot Builder SDK 4 - Microsoft Teams Extensions.
Custom Bot Framework Adapter
Currently we're using default BotFrameworkHttpAdapter available in Bot Framework SDK. You can see that in Startup.cs:// Create the Bot Framework Adapter.
services.AddSingleton<IBotFrameworkHttpAdapter, BotFrameworkHttpAdapter>();- Add AdapterWithErrorHandler to the project
- Copy the content of the class from EchoBot template:
public class AdapterWithErrorHandler : BotFrameworkHttpAdapter { public AdapterWithErrorHandler(ICredentialProvider credentialProvider, ILogger<BotFrameworkHttpAdapter> logger, ConversationState conversationState = null) : base(credentialProvider) { OnTurnError = async (turnContext, exception) => { // Log any leaked exception from the application. logger.LogError($"Exception caught : {exception.Message}"); // Send a catch-all apology to the user. await turnContext.SendActivityAsync("Sorry, it looks like something went wrong."); if (conversationState != null) { try { // Delete the conversationState for the current conversation to prevent the // bot from getting stuck in a error-loop caused by being in a bad state. // ConversationState should be thought of as similar to "cookie-state" in a Web pages. await conversationState.DeleteAsync(turnContext); } catch (Exception e) { logger.LogError($"Exception caught on attempting to Delete ConversationState : {e.Message}"); } } }; } } - Let's reference the Adapter in Startup.cs:
ReplaceWith// Create the Bot Framework Adapter. services.AddSingleton<IBotFrameworkHttpAdapter, BotFrameworkHttpAdapter>();// Create the Bot Framework Adapter. services.AddSingleton<IBotFrameworkHttpAdapter, AdapterWithErrorHandler>();
Middleware
Bot to MS Teams connection is based on Middleware concept. Middleware is simply a class that sits between the adapter and your bot logic, added to your adapter's middleware collection during initialization. The SDK allows you to write your own middleware or add middleware created by others. Every activity coming into or out of your bot flows through your middleware.The adapter processes and directs incoming activities in through the bot middleware pipeline to your bot’s logic and then back out again. As each activity flows in and out of the bot, each piece of middleware can inspect or act upon the activity, both before and after the bot logic runs.
In case of MS Teams there is a TeamsMiddleware implementation that processes activities to add Teams context in TurnState.
So, let's add TeamsMiddleware to our bot implementation.
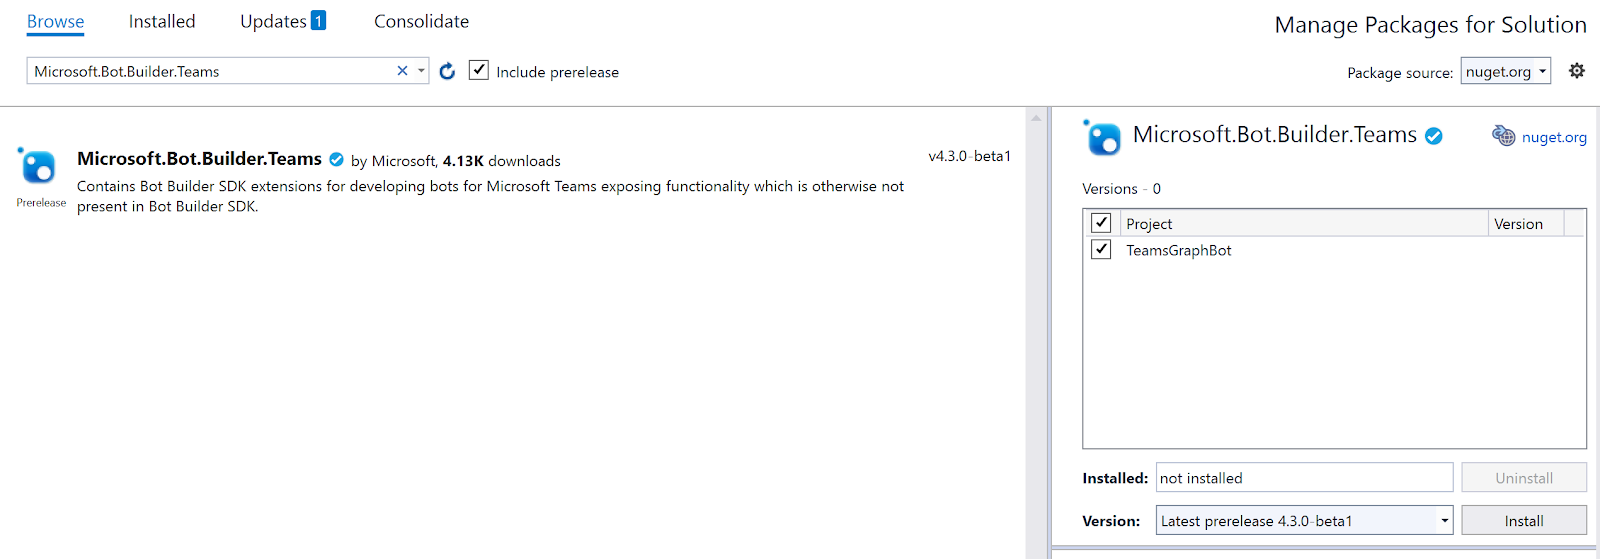
- Add a reference to Microsoft.Bot.Builder.Teams NuGet package. Note: we need version 4.*. And currently the version is in prerelease. That's why you need to check "Include prerelease" checkbox in NuGet Package Manager while searching for the module:
- Add TeamsMiddleware usage in AdapterWithErrorHandler constructor:
Full code of the constructor:
Use(new TeamsMiddleware(credentialProvider));public class AdapterWithErrorHandler : BotFrameworkHttpAdapter { public AdapterWithErrorHandler(ICredentialProvider credentialProvider, ILogger<BotFrameworkHttpAdapter> logger, ConversationState conversationState = null) : base(credentialProvider) { OnTurnError = async (turnContext, exception) => { // Log any leaked exception from the application. logger.LogError($"Exception caught : {exception.Message}"); // Send a catch-all apology to the user. await turnContext.SendActivityAsync("Sorry, it looks like something went wrong."); if (conversationState != null) { try { // Delete the conversationState for the current conversation to prevent the // bot from getting stuck in a error-loop caused by being in a bad state. // ConversationState should be thought of as similar to "cookie-state" in a Web pages. await conversationState.DeleteAsync(turnContext); } catch (Exception e) { logger.LogError($"Exception caught on attempting to Delete ConversationState : {e.Message}"); } } }; Use(new TeamsMiddleware(credentialProvider)); } }
ITeamsContext
Now we can get Teams context in the bot's turns (events).Let's add some simple code to verify that the context is presented and we can get information from it.
- Go to the bot's code (in this sample - TeamsGraphBot.cs)
- Override OnMessageActivityAsync method to react on user's messages
- Add code to check for MS Teams context and to display some of the properties:
protected override async Task OnMessageActivityAsync(ITurnContext<IMessageActivity> turnContext, CancellationToken cancellationToken) { var teamsContext = turnContext.TurnState.Get<ITeamsContext>(); if (teamsContext != null) // the bot is used inside MS Teams { if (teamsContext.Team != null) // inside team { await turnContext.SendActivityAsync(MessageFactory.Text($"Team Id: {teamsContext.Team.Id}"), cancellationToken).ConfigureAwait(false); } else // private or group chat { await turnContext.SendActivityAsync(MessageFactory.Text($"We're in MS Teams but not in Team"), cancellationToken).ConfigureAwait(false); } } else // outside MS Teams { await turnContext.SendActivityAsync(MessageFactory.Text("We're not in MS Teams context"), cancellationToken).ConfigureAwait(false); } }
Publish
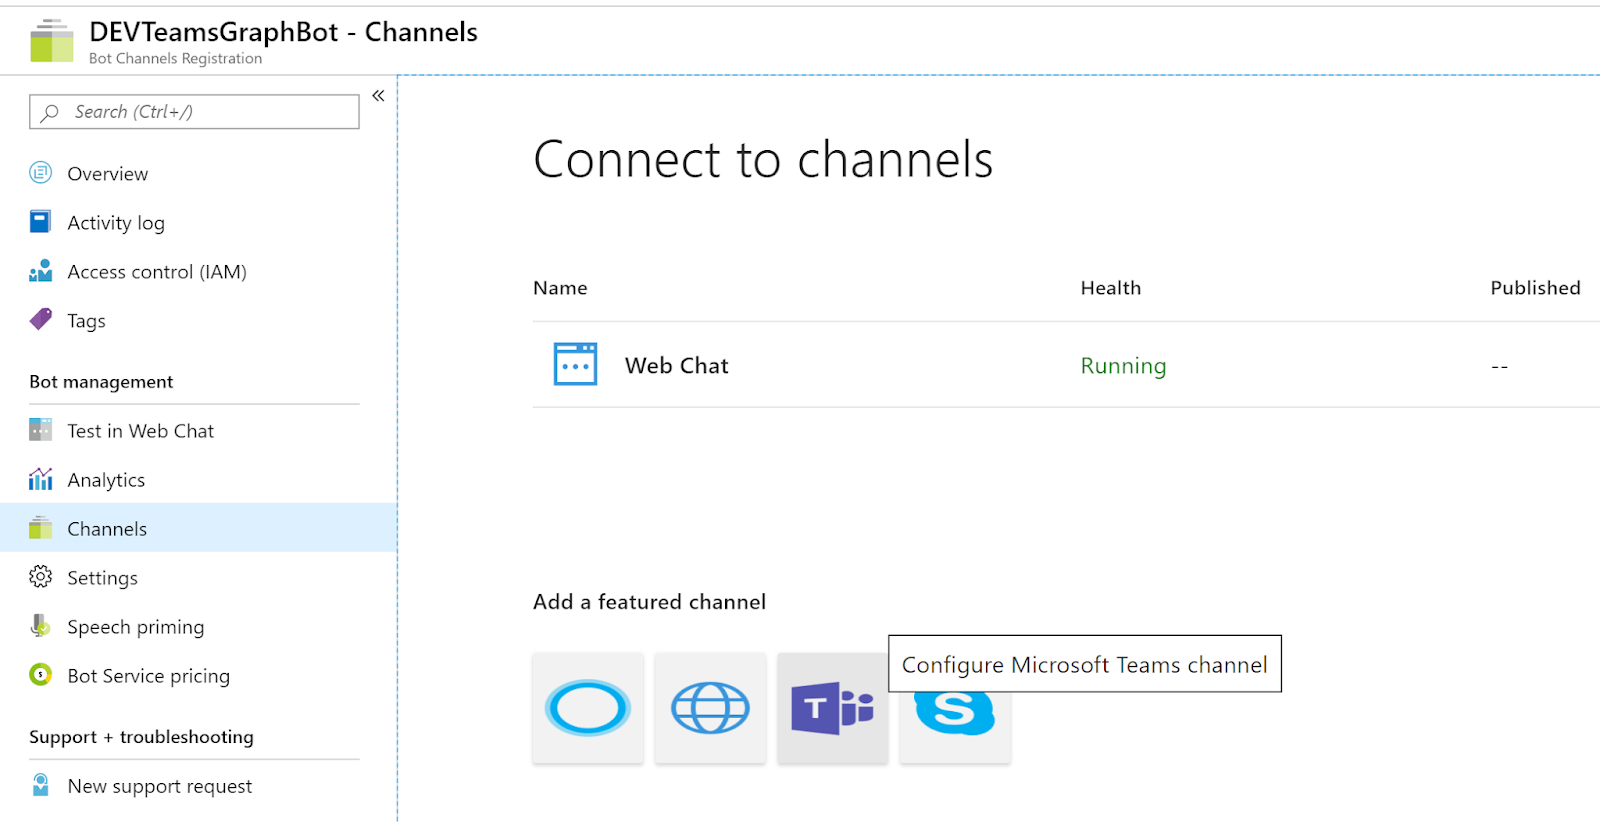
Let's publish all the changes to Azure so we could use them later on from MS Teams.Add Microsoft Teams Channel to the Bot
A channel is a connection between the bot and communication apps. You configure a bot to connect to the channels you want it to be available on. The Bot Framework Service, configured through the Azure portal, connects your bot to these channels and facilitates communication between your bot and the user. Web Chat channel is pre-configured for you.Now we need to add Microsoft Teams channel to the bot.
- Sign in to Azure Portal.
- Select the bot that you want to configure.
- In the Bot Service blade, click Channels under Bot Management.
- Click on Microsoft Teams icon to add MS Teams channel to the bot:
Add Teams App with the Bot
Our bot is ready to work with MS Teams. But MS Teams knows nothing about the bot.We need to register new app and provide information about our bot. It will allow Microsoft Teams to communicate with the bot.
- Go to MS Teams (either desktop or web client)
- Open App Studio. If you're not familiar with App Studio you can read more about it here.
- Navigate to Manifest Editor tab and click Create a new app
- Enter App Details:
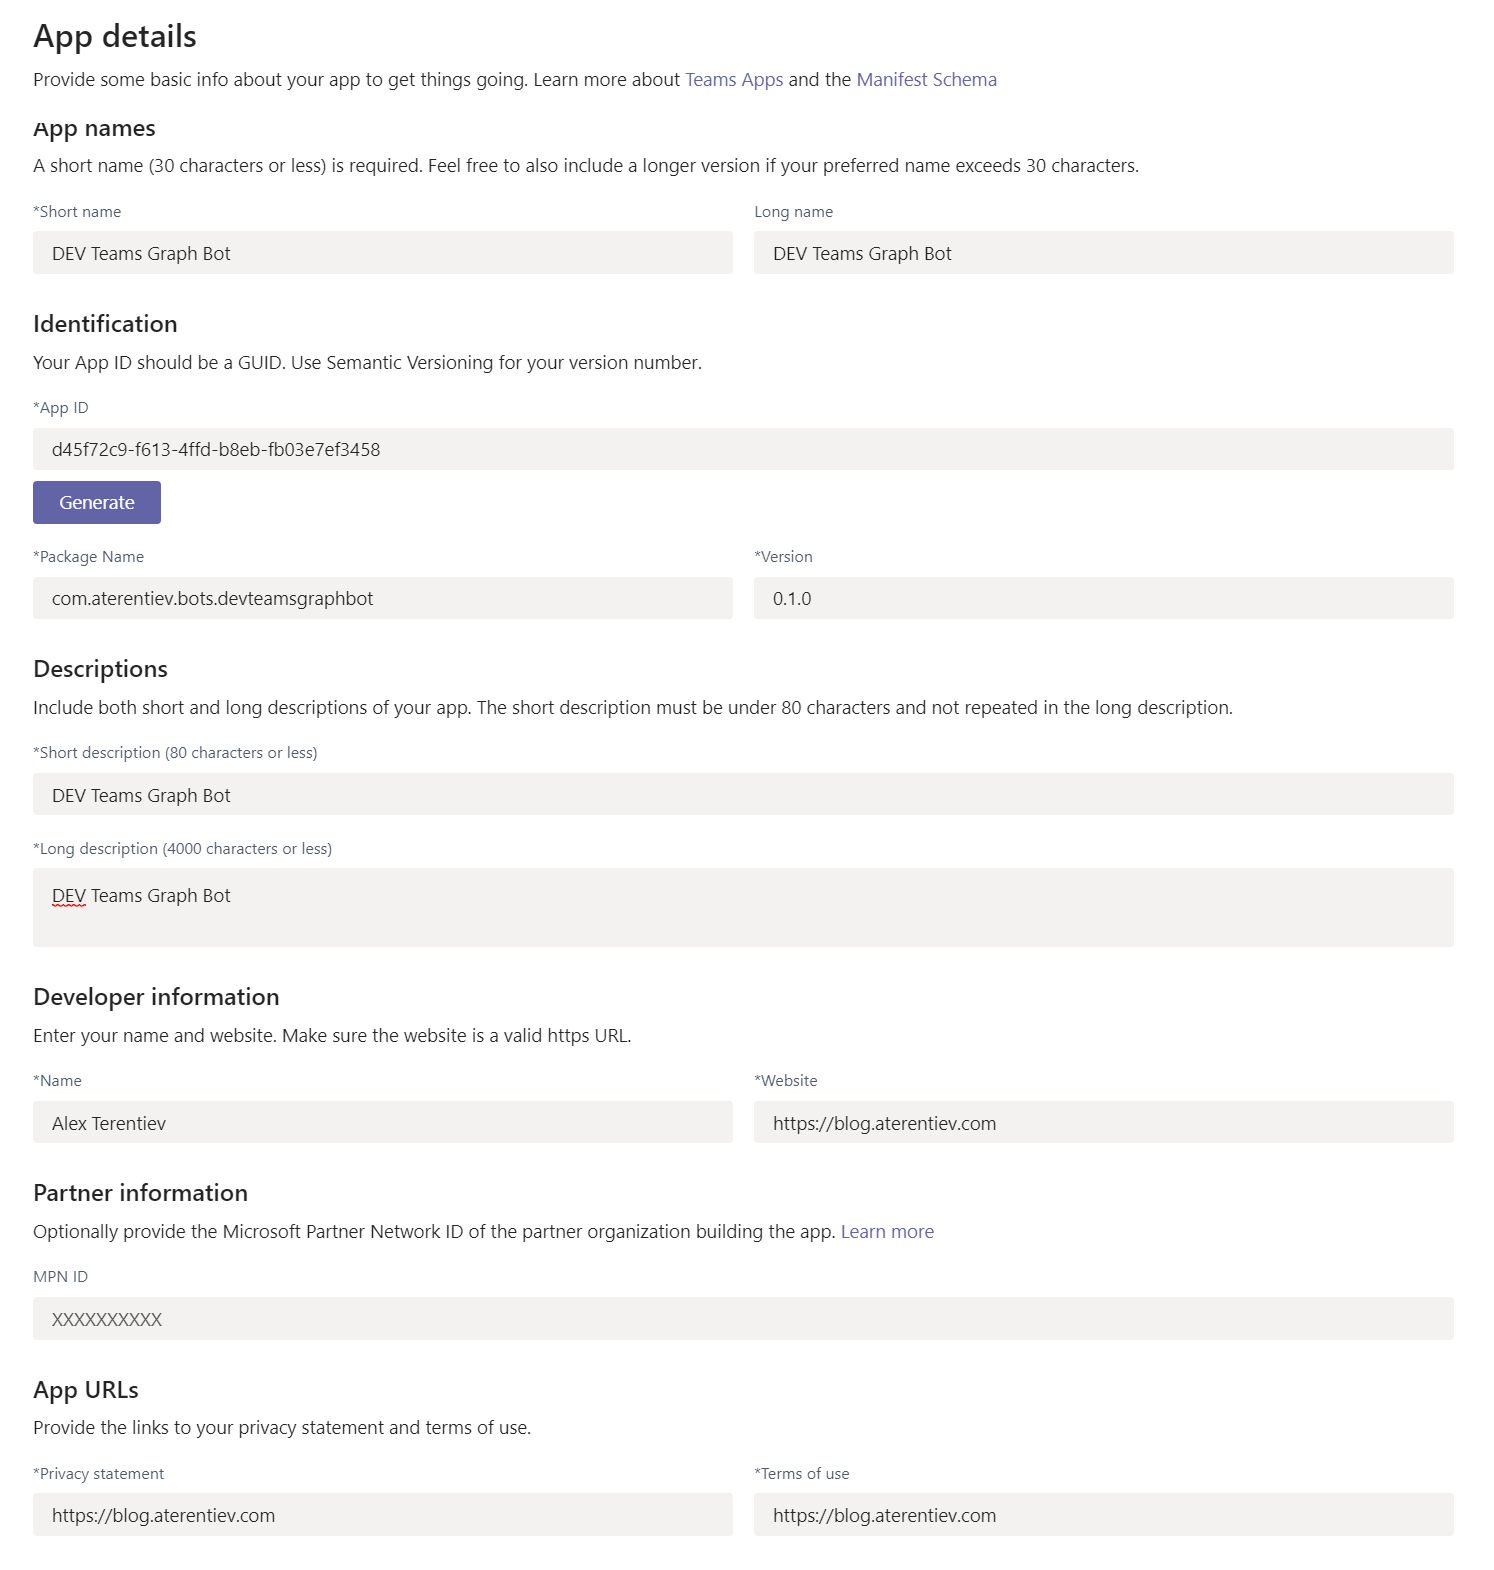
The most important setting in App Details is Short Name. This name will be used to @mention bot in conversations. - Add bot information in Capabilities section:
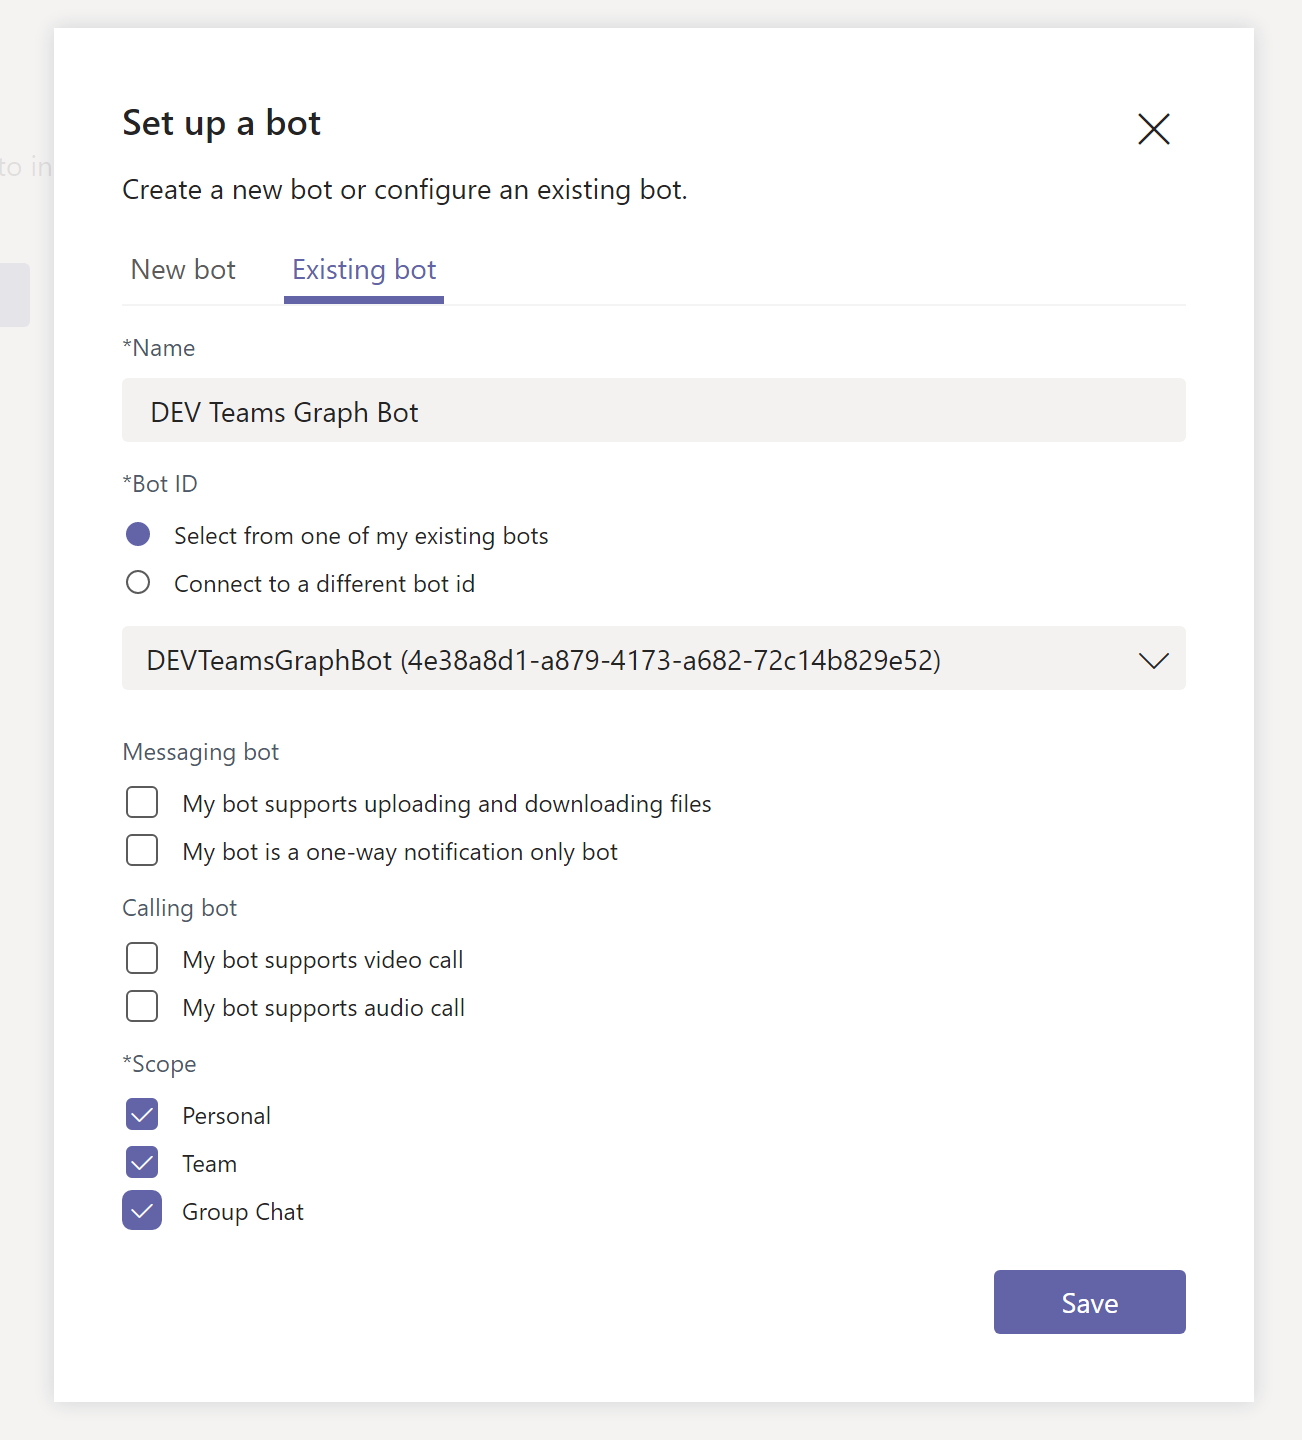
where:- We need to select Existing bot as we're going to connect to the bot that has been already create.
- Name - Name of the bot.
- Bot Id - App ID of the bot's Azure AD Application (created above). Here you can either enter the value manually, or select Select from one of my existing bots if the bot is registered in the Azure AD connected to the current tenant.
- Select all the scopes you want. I selected all 3 to make the bot available in every conversation type.
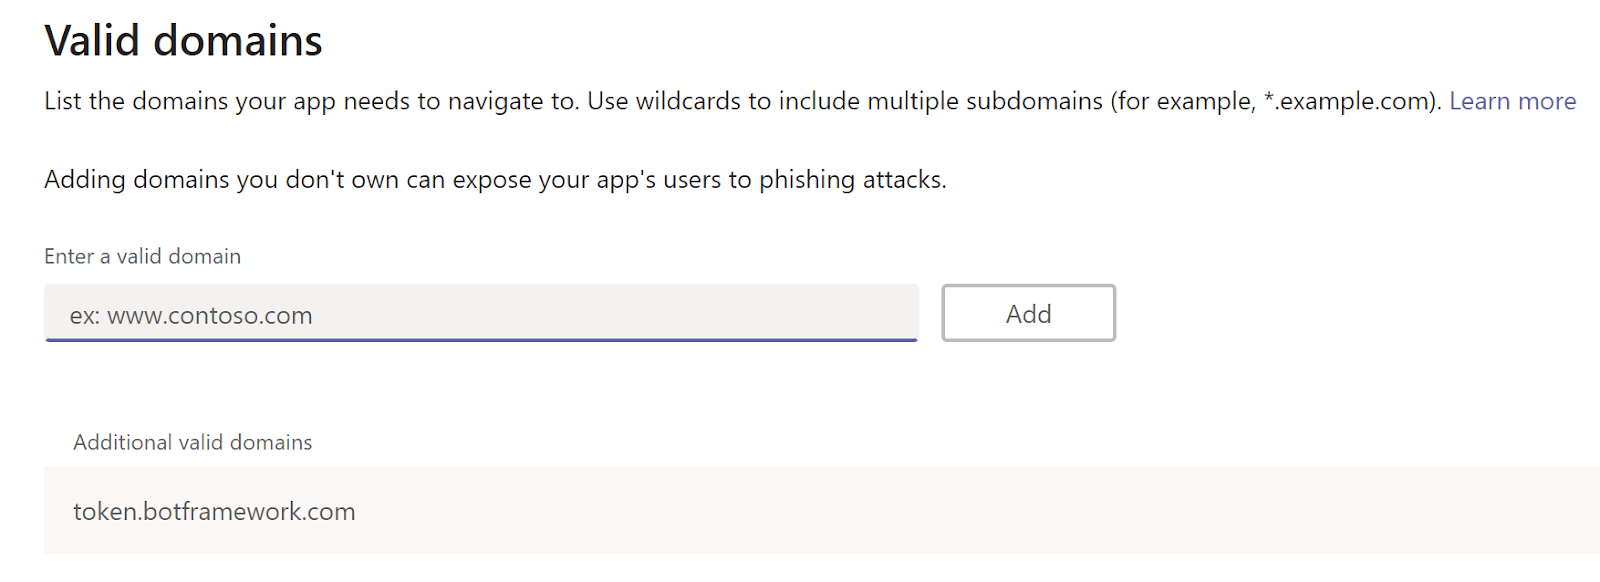
For this sample we can leave everything as is. - Add token.botframework.com in the list of valid domains in Domains and permissions section:
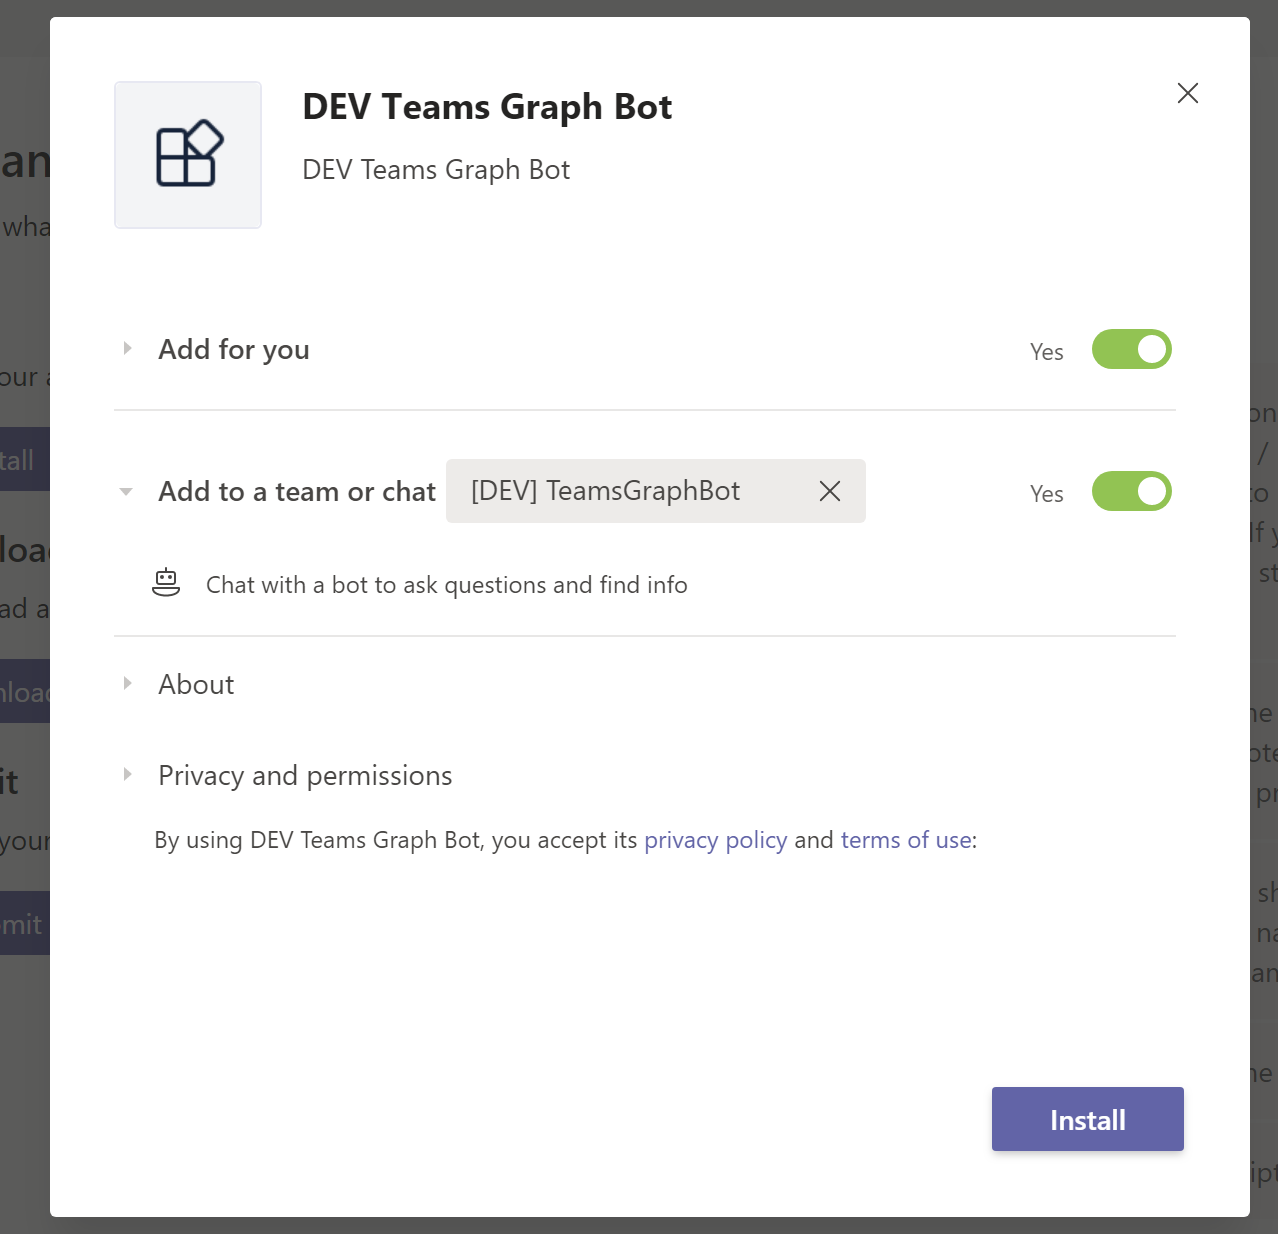
It will allow to implement authentication flow later on. - Go to Test and distribute section and click Install
- In the popup select Add for you as well as some team in Add to a team or chat and click Install. It will create a private chat with bot and will add the bot to the selected team:
Now the bot can be tested from the Team:
And from one-on-one chat:
State and Dialogs
Next step in our journey is to add state and dialogs to the bot.State
Our bot is just an asp.net core web application. And it is stateless by default, meaning that the bot doesn't know what happened in a previous round of the conversation and can't use this information, or data, for the next action.But thankfully, we can add state support to our project.
There are 3 different types of state:
- User state - available in any turn that the bot is conversing with that user on that channel, regardless of the conversation.
- Conversation state - available in any turn in a specific conversation, regardless of user (i.e. group conversations)
- Private conversation state - scoped to both the specific conversation and to that specific user
- As state should be stored somewhere, we need to add storage layer to the bot. For development purposes, we'll be using in-memory storage. But for production Microsoft recommends to use CosmosDB storage implementation. You can also create your own implementation of storage layer if needed.
So, let's add in-memory storage layer in Startup.cs ConfigureServices:// storage services.AddSingleton<IStorage, MemoryStorage>(); - Now we can add states singletons to our bot. It is also done in Startup.cs ConfigureServices:
// Create the User state. (Used in this bot's Dialog implementation.) services.AddSingleton<UserState>(); // Create the Conversation state. (Used by the Dialog system itself.) services.AddSingleton<ConversationState>();
// This method gets called by the runtime. Use this method to add services to the container.
public void ConfigureServices(IServiceCollection services)
{
services.AddMvc().SetCompatibilityVersion(CompatibilityVersion.Version_2_1);
// Create the credential provider to be used with the Bot Framework Adapter.
services.AddSingleton<ICredentialProvider, ConfigurationCredentialProvider>();
// Create the Bot Framework Adapter.
services.AddSingleton<IBotFrameworkHttpAdapter, AdapterWithErrorHandler>();
// storage
services.AddSingleton<IStorage, MemoryStorage>();
// Create the User state. (Used in this bot's Dialog implementation.)
services.AddSingleton<UserState>();

// Create the Conversation state. (Used by the Dialog system itself.)
services.AddSingleton<ConversationState>();
// Create the bot as a transient. In this case the ASP Controller is expecting an IBot.
services.AddTransient<IBot, EmptyBot>();
}Dialogs
Dialogs are structures in your bot that act like functions in your bot's program; each dialog is designed to perform a specific task, in a specific order.You can also think of dialogs like "topics" in the conversation. For example, "how can I help" is the initial topic. User replies to bot's question, and the bot decides what other topic (dialog) to start (create support request, show current weather, etc.).
Please, read official documentation to be familiar with dialog concepts, such as dialog sets, dialog context, dialog result, and different types of dialogs available in the SDK.
Let's add dialogs support to our project and modify the bot to work with dialogs.
- First, let's install Microsoft.Bot.Builder.Dialogs NuGet package
- Next, create DialogExtensions.cs class. This class appears in many samples and contains Run extension method to correctly start new or continue existing dialog:
public static class DialogExtensions { public static async Task Run(this Dialog dialog, ITurnContext turnContext, IStatePropertyAccessor<DialogState> accessor, CancellationToken cancellationToken = default(CancellationToken)) { var dialogSet = new DialogSet(accessor); dialogSet.Add(dialog); var dialogContext = await dialogSet.CreateContextAsync(turnContext, cancellationToken); var results = await dialogContext.ContinueDialogAsync(cancellationToken); if (results.Status == DialogTurnStatus.Empty) { await dialogContext.BeginDialogAsync(dialog.Id, null, cancellationToken); } } } - Next, let's create a generic base bot to work with dialogs. Let's call it DialogBot and add it to the new Bots folder:
Basically, this base class provides default implementation for OnTurnAsync and OnMessageActivityAsync to start a dialog with the user.
public class DialogBot<T> : ActivityHandler where T : Dialog { protected readonly BotState ConversationState; protected readonly Dialog Dialog; protected readonly ILogger Logger; protected readonly BotState UserState; public DialogBot(ConversationState conversationState, UserState userState, T dialog, ILogger<DialogBot<T>> logger) { ConversationState = conversationState; UserState = userState; Dialog = dialog; Logger = logger; } public override async Task OnTurnAsync(ITurnContext turnContext, CancellationToken cancellationToken = default(CancellationToken)) { if (turnContext?.Activity?.Type == ActivityTypes.Invoke && turnContext.Activity.ChannelId == "msteams") await Dialog.Run(turnContext, ConversationState.CreateProperty<DialogState>(nameof(DialogState)), cancellationToken); else await base.OnTurnAsync(turnContext, cancellationToken); // Save any state changes that might have occurred during the turn. await ConversationState.SaveChangesAsync(turnContext, false, cancellationToken); await UserState.SaveChangesAsync(turnContext, false, cancellationToken); } protected override async Task OnMessageActivityAsync(ITurnContext<IMessageActivity> turnContext, CancellationToken cancellationToken) { Logger.LogInformation("Running dialog with Message Activity."); // Run the Dialog with the new message Activity. await Dialog.Run(turnContext, ConversationState.CreateProperty<DialogState>(nameof(DialogState)), cancellationToken); } } - Now, let's create a new bot that inherits DialogBot and duplicates OnMembersAddedAsync logic of our initial bot.
public class GraphBot<T> : DialogBot<T> where T : Dialog { public GraphBot(ConversationState conversationState, UserState userState, T dialog, ILogger<DialogBot<T>> logger) : base(conversationState, userState, dialog, logger) { } protected override async Task OnMembersAddedAsync(IList<ChannelAccount> membersAdded, ITurnContext<IConversationUpdateActivity> turnContext, CancellationToken cancellationToken) { foreach (var member in membersAdded) { if (member.Id != turnContext.Activity.Recipient.Id) { await turnContext.SendActivityAsync(MessageFactory.Text($"Hello world!"), cancellationToken).ConfigureAwait(false); } } } } - Next - add MainDialog implementation that will be an entry point Dialog of our bot, and move our Teams-related logic to it:
We inherited the dialog from ComponentDialog. It provides a strategy for creating independent dialogs to handle specific scenarios, breaking a large dialog set into more manageable pieces. Each of these pieces has its own dialog set, and avoids any name collisions with the dialog set that contains it. It's like a reusable component that aggregates multiple controls.
public class MainDialog : ComponentDialog
{
  protected readonly ILogger _logger;

  public MainDialog(ILogger<MainDialog> logger) : base(nameof(MainDialog))
  {
    _logger = logger;

    AddDialog(new WaterfallDialog(nameof(WaterfallDialog), new WaterfallStep[]
    {
      DisplayContextInfoStepAsync
    }));

    InitialDialogId = nameof(WaterfallDialog);

  }

  private async Task<DialogTurnResult> DisplayContextInfoStepAsync(WaterfallStepContext stepContext, CancellationToken cancellationToken)
  {
    var teamsContext = stepContext.Context.TurnState.Get<ITeamsContext>();

    if (teamsContext != null) // the bot is used inside MS Teams
    {
      if (teamsContext.Team != null) // inside team
      {
        await stepContext.Context.SendActivityAsync(MessageFactory.Text($"Team Id: {teamsContext.Team.Id}"), cancellationToken).ConfigureAwait(false);
      }
      else // private or group chat
      {
        await stepContext.Context.SendActivityAsync(MessageFactory.Text($"We're in MS Teams but not in Team"), cancellationToken).ConfigureAwait(false);
      }
    }
    else // outside MS Teams
    {
      await stepContext.Context.SendActivityAsync(MessageFactory.Text("We're not in MS Teams context"), cancellationToken).ConfigureAwait(false);
    }

    return await stepContext.EndDialogAsync();
  }
}
And if you look at the constructor code - we're adding WaterfallDialog to internal dialog set. A WaterfallDialog is a specific implementation of a dialog that is commonly used to collect information from the user or guide the user through a series of tasks. Steps of the dialog are executed sequentially. In our case right now there is the only step DisplayContextInfoStepAsync to display Teams context info.
The last interesting part of the constructor is InitialDialogId = nameof(WaterfallDialog);. We can have multiple dialogs inside ComponentDialog, and this line of code shows the SDK what dialog to launch when MainDialog is started. - Now, we can reference MainDialog and new bot in Startup.cs and delete old (initial) bot from the project.
Replace services.AddTransient<IBot, EmptyBot>(); withservices.AddSingleton<MainDialog>(); services.AddTransient<IBot, GraphBot<MainDialog>>();
Authentication Time!
Now when state and dialogs are configured, we're ready to implement authentication in the bot, and get access to MS Graph.There are few different parts in this process as well.
Register Additional Azure AD App for Authentication
We've already registered one app while registering the bot... But, quoting official documentation: Whenever you register a bot in Azure, it gets assigned an Azure AD app. However, this app secures channel-to-bot access. You need an additional AAD app for each application that you want the bot to be able to authenticate on behalf of the user.So, let's register additional app with needed permissions:
- Go to Azure AD -> App Registrations
- Select New registration
- Enter name. In this sample - DEVTeamsGraphBotAuth
- For account types select Accounts in any organizational directory and personal Microsoft accounts (e.g. Skype, Xbox, Outlook.com)
- Enter https://token.botframework.com/.auth/web/redirect as Redirect URI
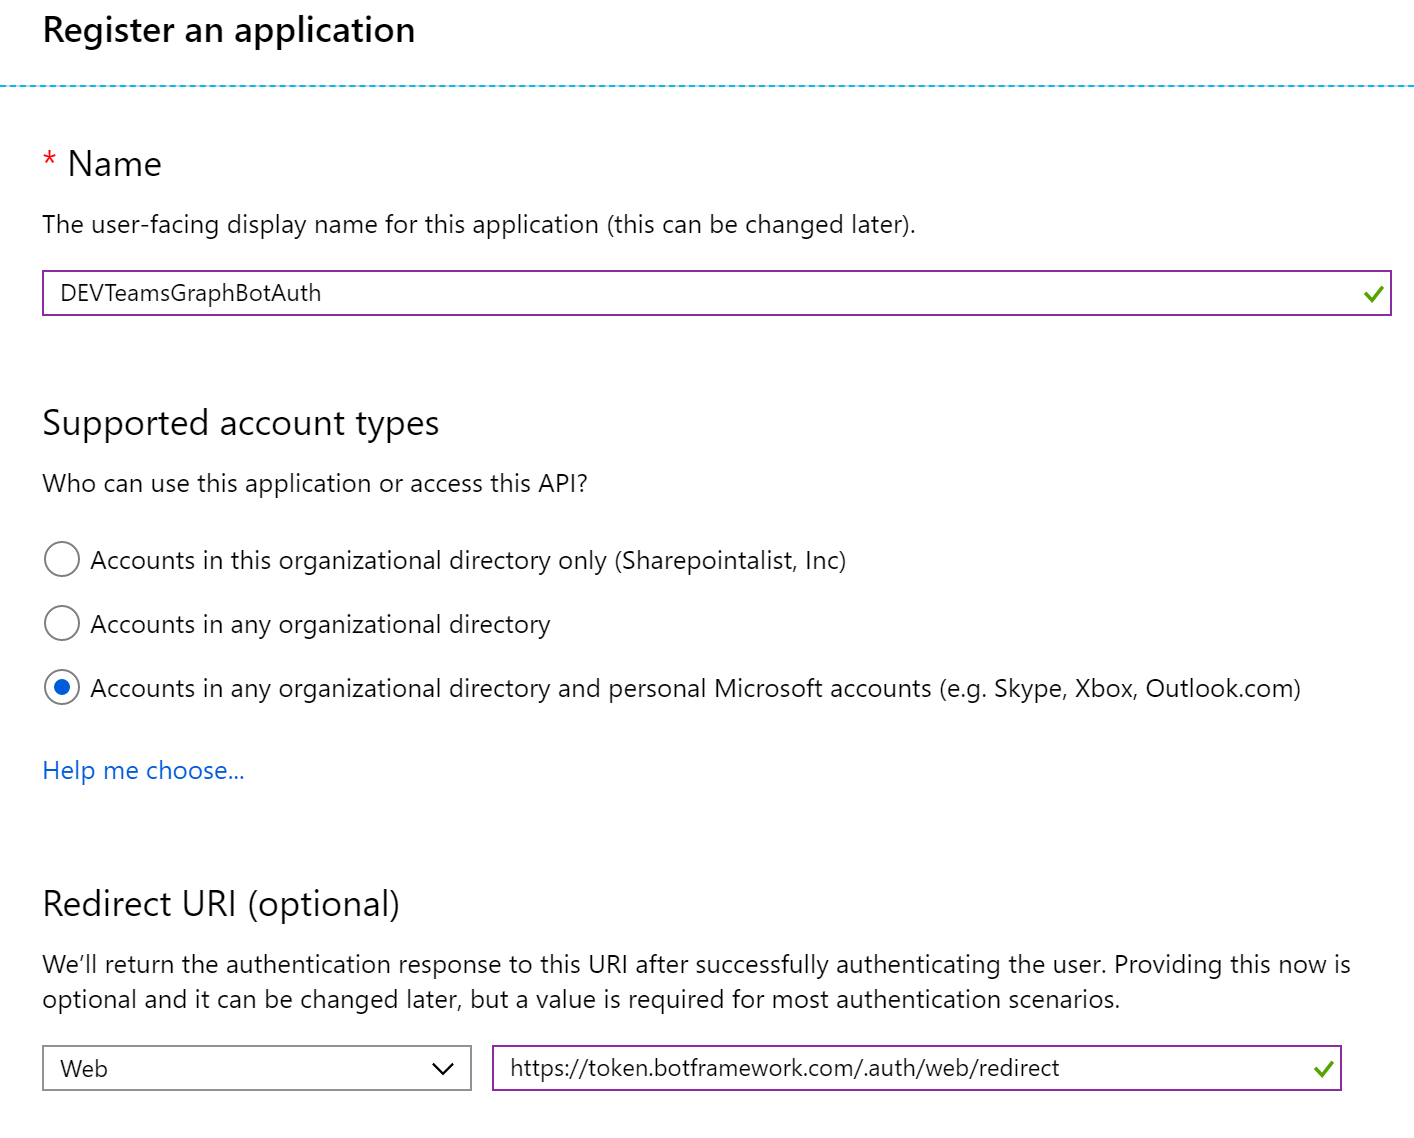
- Click Register
- Go to Certificates & secrets and generate new Client Secret. Store both App ID and Client Secret for next steps.
- Go to API Permissions and add permissions you're planning to use in the bot. In this sample we're going to access Group and Site resources. So the permissions are:
- Group.Read.All
- Sites.Read.All
Update Bot Settings with Connection Setting
Next step is to update Bot Settings in Azure - we need to provide a connection setting that reference newly registered Azure AD App. This configuration will be used to request authentication and permissions from the bot.- Navigate to registered Bot Service
- Go to Settings -> OAuth Connection Settings -> Add Setting
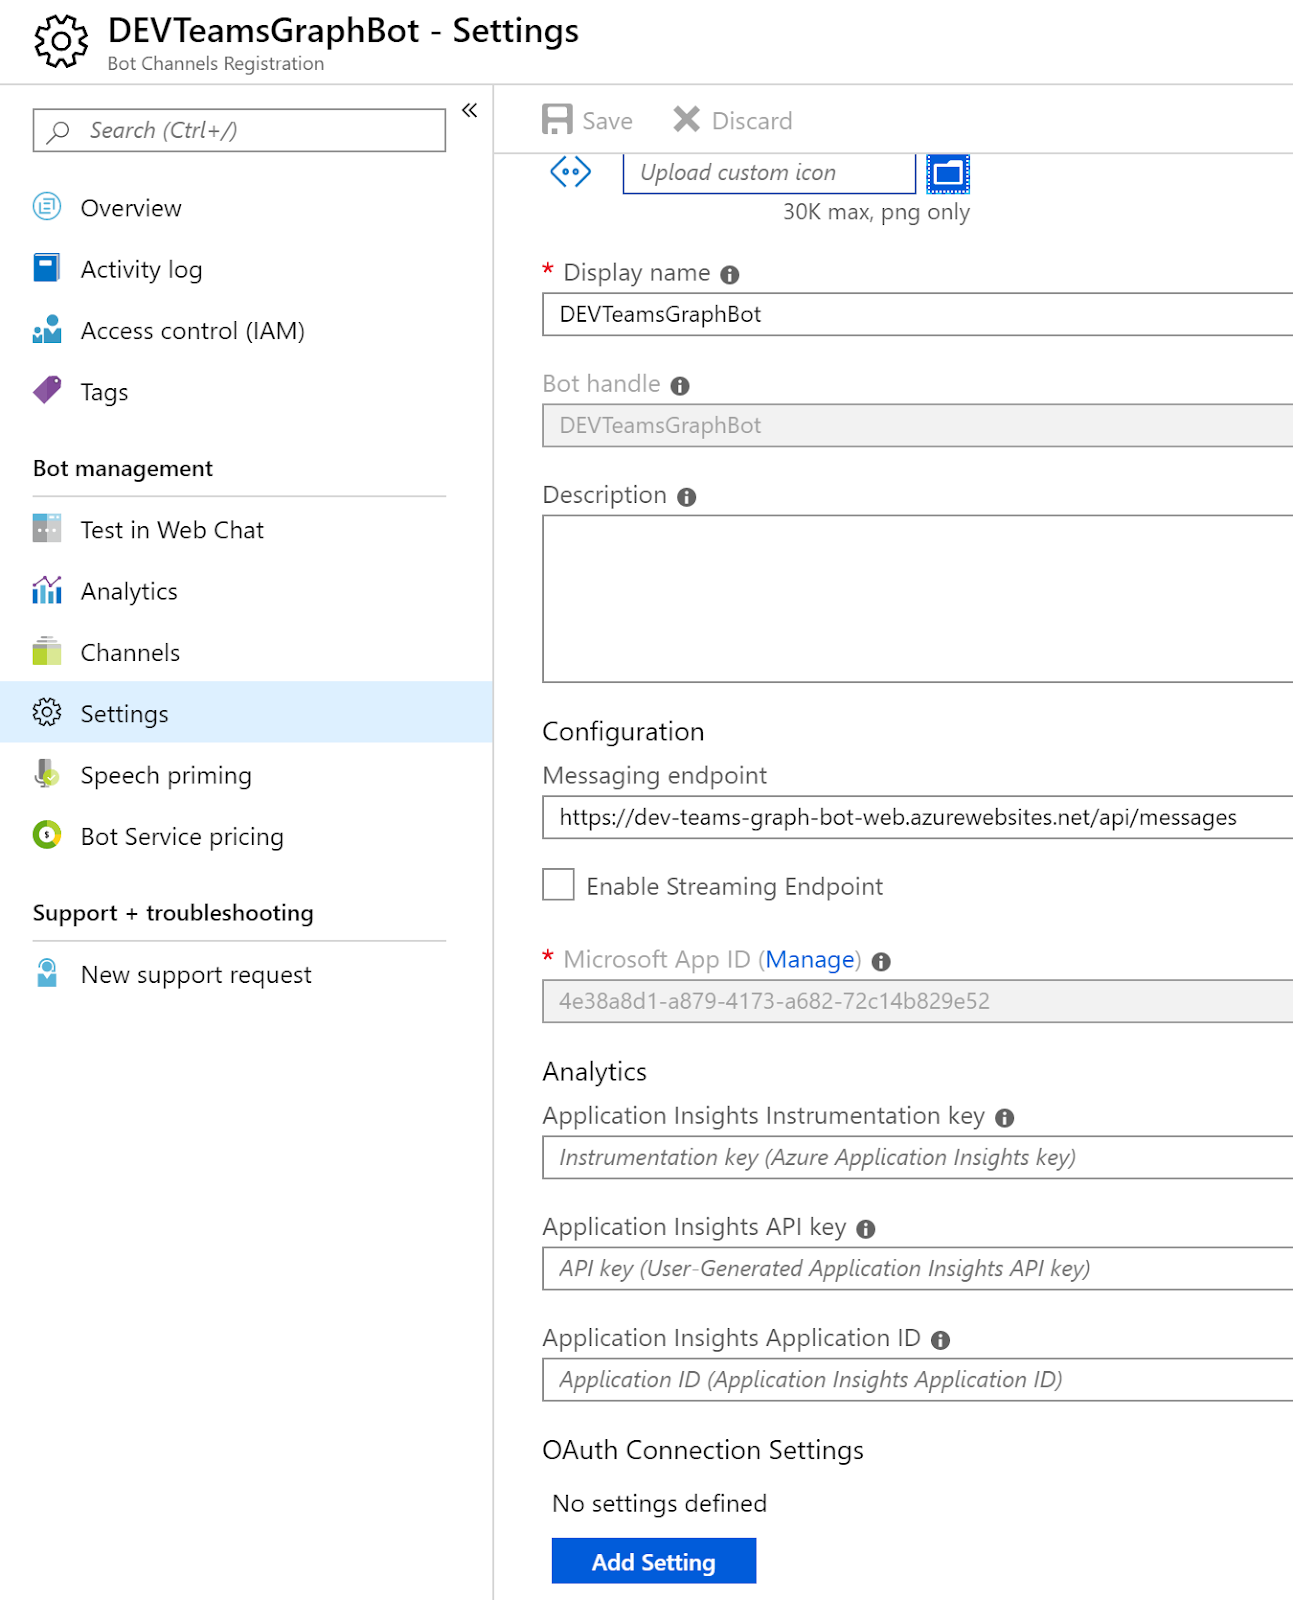
- Enter some name. For example, you can use the same name as for Azure AD App - DEVTeamsGraphBotAuth
- For Service Provider select Azure Active Directory v2
- Enter stored Client ID and Client Secret of the Azure AD App
- For Tenant ID you can either enter your Azure AD ID, or common to be available across tenants
- For Scopes we need to enter the same permissions as for API Permissions section in Azure AD App: Group.Read.All and Sites.Read.All. The values should be separated by space
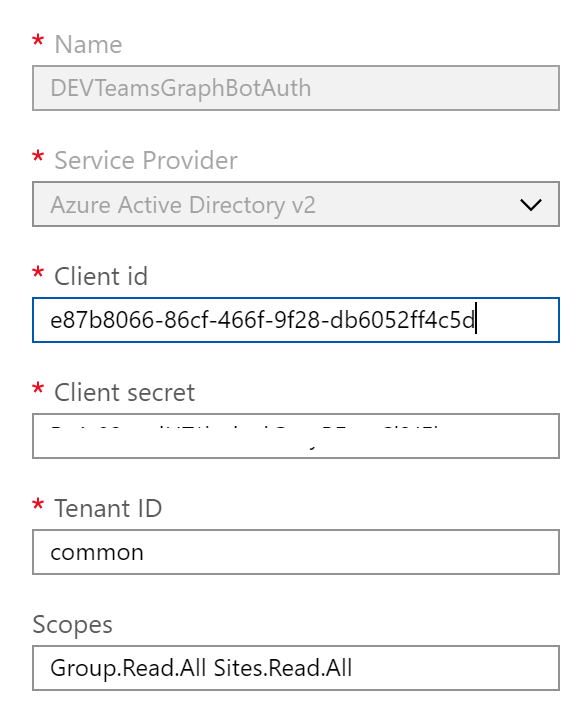
- Hit Save
Add Authentication Step to the Bot
Azure part is done. Now, let's do needed changes in the code to initiate authentication from there.For that purposes we'll be using OAuthPrompt dialog as a part of our MainDialog flow.
- Add new property to appsettings.json - ConnectionName. Value of that property should be the name of the Connection Setting we've just added to the bot. In this sample - DEVTeamsGraphBotAuth
- Modify MainDialog constructor to have additional parameter - configuration:
public MainDialog(ILogger<MainDialog> logger, IConfiguration configuration) : base(nameof(MainDialog)) - Add OAuthPrompt dialog in MainDialog constructor:
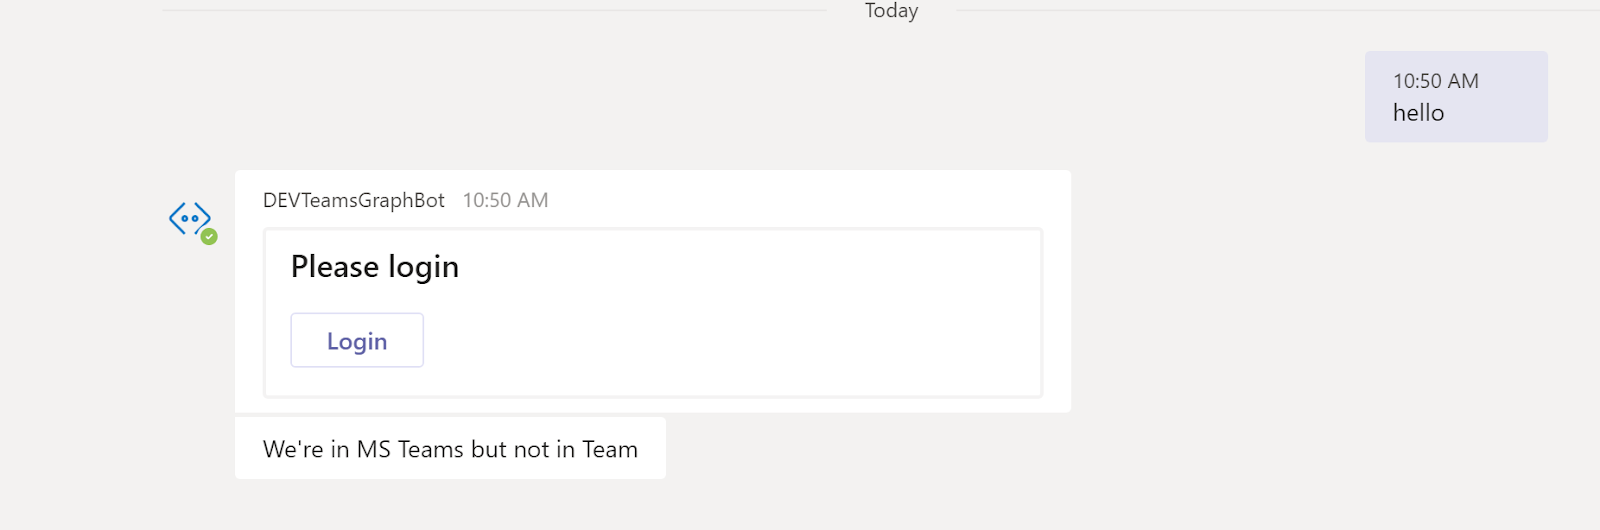
AddDialog(new OAuthPrompt( nameof(OAuthPrompt), new OAuthPromptSettings { ConnectionName = configuration["ConnectionName"], Text = "Please login", Title = "Login", Timeout = 300000 })); - Add prompt step as the first step of the dialog to prompt for login:
And in constructor:
private async Task<DialogTurnResult> PromptStepAsync(WaterfallStepContext stepContext, CancellationToken cancellationToken) { return await stepContext.BeginDialogAsync(nameof(OAuthPrompt), null, cancellationToken); }AddDialog(new WaterfallDialog(nameof(WaterfallDialog), new WaterfallStep[] { PromptStepAsync, DisplayContextInfoStepAsync })); - Modify Info step to check for access token:
The whole code of the MainDialog class:
private async Task<DialogTurnResult> DisplayContextInfoStepAsync(WaterfallStepContext stepContext, CancellationToken cancellationToken) { if (stepContext.Result != null) { var tokenResponse = stepContext.Result as TokenResponse; if (tokenResponse?.Token != null) { // same code as before } } return await stepContext.EndDialogAsync(); }public class MainDialog : ComponentDialog { protected readonly ILogger _logger; public MainDialog(ILogger<MainDialog> logger, IConfiguration configuration) : base(nameof(MainDialog)) { _logger = logger; AddDialog(new OAuthPrompt( nameof(OAuthPrompt), new OAuthPromptSettings { ConnectionName = configuration["ConnectionName"], Text = "Please login", Title = "Login", Timeout = 300000 })); AddDialog(new WaterfallDialog(nameof(WaterfallDialog), new WaterfallStep[] { PromptStepAsync, DisplayContextInfoStepAsync })); InitialDialogId = nameof(WaterfallDialog); } private async Task<DialogTurnResult> PromptStepAsync(WaterfallStepContext stepContext, CancellationToken cancellationToken) { return await stepContext.BeginDialogAsync(nameof(OAuthPrompt), null, cancellationToken); } private async Task<DialogTurnResult> DisplayContextInfoStepAsync(WaterfallStepContext stepContext, CancellationToken cancellationToken) { if (stepContext.Result != null) { var tokenResponse = stepContext.Result as TokenResponse; if (tokenResponse?.Token != null) { var teamsContext = stepContext.Context.TurnState.Get<ITeamsContext>(); if (teamsContext != null) // the bot is used inside MS Teams { if (teamsContext.Team != null) // inside team { await stepContext.Context.SendActivityAsync(MessageFactory.Text($"Team Id: {teamsContext.Team.Id}"), cancellationToken).ConfigureAwait(false); } else // private or group chat { await stepContext.Context.SendActivityAsync(MessageFactory.Text($"We're in MS Teams but not in Team"), cancellationToken).ConfigureAwait(false); } } else // outside MS Teams { await stepContext.Context.SendActivityAsync(MessageFactory.Text("We're not in MS Teams context"), cancellationToken).ConfigureAwait(false); } } } return await stepContext.EndDialogAsync(); } } - Last thing to do is to add OnTokenResponseEventAsync implementation to the bot itself (you can add it to the base DialogBot). This event will be generated if the token has already been acquired before and there is no need for auth prompt:
protected override async Task OnTokenResponseEventAsync(ITurnContext<IEventActivity> turnContext, CancellationToken cancellationToken)
{
  Logger.LogInformation("Running dialog with Token Response Event Activity.");

  // Run the Dialog with the new Token Response Event Activity.
  await Dialog.Run(turnContext, ConversationState.CreateProperty<DialogState>(nameof(DialogState)), cancellationToken);
}
Add MS Graph Logic
Let's finally add some logic to test that the authentication and Teams context work.As mentioned before, we'll be getting Group based on the current Team, and some properties of the site associated with the group (team).
Getting Group ID from Teams Context
First step here is to get Group ID that can be used to request data from MS Graph.If you look at TeamInfo class which is a type of ITeamsContext.Team property, you'll see that it contains Team Name and Id. Nothing else.
To get Group Id we need to perform additional operation included in ITeamsContext - FetchTeamDetailsWithHttpMessagesAsync.
Let's modify our code to get Team details if the conversation is happening inside a Team:
if (teamsContext.Team != null) // inside team
{
  var team = teamsContext.Team;
  var teamDetails = await teamsContext.Operations.FetchTeamDetailsWithHttpMessagesAsync(team.Id);

  await stepContext.Context.SendActivityAsync(MessageFactory.Text($"Team Id: {teamsContext.Team.Id}"), cancellationToken).ConfigureAwait(false);
}Requesting needed information from MS Graph
Now, let's implement MS Graph part...- Install Microsoft.Graph NuGet package
- Create Graph Client:
var token = tokenResponse.Token; var graphClient = new GraphServiceClient( new DelegateAuthenticationProvider( requestMessage => { // Append the access token to the request. requestMessage.Headers.Authorization = new AuthenticationHeaderValue("bearer", token); // Get event times in the current time zone. requestMessage.Headers.Add("Prefer", "outlook.timezone=\"" + TimeZoneInfo.Local.Id + "\""); return Task.CompletedTask; }) ); - Get information about the site:
var siteInfo = await graphClient.Groups[teamDetails.Body.AadGroupId].Sites["root"].Request().GetAsync(); - Display site properties:
await stepContext.Context.SendActivityAsync(MessageFactory.Text($"Site Id: {siteInfo.Id}, Site Title: {siteInfo.DisplayName}, Site Url: {siteInfo.WebUrl}"), cancellationToken).ConfigureAwait(false);
private async Task<DialogTurnResult> DisplayContextInfoStepAsync(WaterfallStepContext stepContext, CancellationToken cancellationToken)
{
  if (stepContext.Result != null)
  {
    var tokenResponse = stepContext.Result as TokenResponse;
    if (tokenResponse?.Token != null)
    {
      var teamsContext = stepContext.Context.TurnState.Get<ITeamsContext>();

      if (teamsContext != null) // the bot is used inside MS Teams
      {
        if (teamsContext.Team != null) // inside team
        {
          var team = teamsContext.Team;
          var teamDetails = await teamsContext.Operations.FetchTeamDetailsWithHttpMessagesAsync(team.Id);
          var token = tokenResponse.Token;

          var graphClient = new GraphServiceClient(
            new DelegateAuthenticationProvider(
              requestMessage =>
              {
                // Append the access token to the request.
                requestMessage.Headers.Authorization = new AuthenticationHeaderValue("bearer", token);

                // Get event times in the current time zone.
                requestMessage.Headers.Add("Prefer", "outlook.timezone=\"" + TimeZoneInfo.Local.Id + "\"");

                return Task.CompletedTask;
            })
          );

          var siteInfo = await graphClient.Groups[teamDetails.Body.AadGroupId].Sites["root"].Request().GetAsync();

          await stepContext.Context.SendActivityAsync(MessageFactory.Text($"Site Id: {siteInfo.Id}, Site Title: {siteInfo.DisplayName}, Site Url: {siteInfo.WebUrl}"), cancellationToken).ConfigureAwait(false);
        }
        else // private or group chat
        {
          await stepContext.Context.SendActivityAsync(MessageFactory.Text($"We're in MS Teams but not in Team"), cancellationToken).ConfigureAwait(false);
        }
      }
      else // outside MS Teams
      {
        await stepContext.Context.SendActivityAsync(MessageFactory.Text("We're not in MS Teams context"), cancellationToken).ConfigureAwait(false);
      }
    }
  }

  return await stepContext.EndDialogAsync();
}
Next Steps
Now when we have the basement, we can improve our bot by adding different commands, routing between dialogs, displaying Adaptive Cards, etc.References
Here are helpful links that were used to come up with this step-by-step guidance:- https://marketplace.visualstudio.com/items?itemName=BotBuilder.botbuilderv4 - Visual Studio Templates for Bot Framework
- https://docs.microsoft.com/en-us/azure/bot-service/bot-builder-deploy-az-cli?view=azure-bot-service-4.0&tabs=newrg - deploying bot to Azure
- https://docs.microsoft.com/en-us/cli/azure/?view=azure-cli-latest - Azure CLI
- https://github.com/Microsoft/BotFramework-Emulator/wiki/Getting-Started - Bot Emulator Getting Started
- https://github.com/Microsoft/BotFramework-Emulator/wiki/Tunneling-(ngrok) - Configuring Bot Emulator to use ngrok
- https://www.nuget.org/packages/Microsoft.Bot.Connector.Teams - Bot connector for Teams
- https://docs.microsoft.com/en-us/microsoftteams/platform/concepts/bots/bots-create - creating bots for Teams
- https://github.com/OfficeDev/BotBuilder-MicrosoftTeams-dotnet - Bot Builder SDK 4 - Microsoft Teams Extensions
- https://mybuild.techcommunity.microsoft.com/sessions/77026?source=sessions#top-anchor - Jeremy Thake and Nick Kramer session around bots, teams and Graph from MS Build
- https://docs.microsoft.com/en-us/azure/bot-service/bot-builder-concept-state?view=azure-bot-service-4.0 - Managing state in bots
- https://docs.microsoft.com/en-us/azure/bot-service/bot-builder-concept-dialog?view=azure-bot-service-4.0 - Dialogs library
- https://github.com/microsoft/BotBuilder-Samples/tree/master/samples/csharp_dotnetcore/24.bot-authentication-msgraph - Bot authentication for MS Graph sample
- https://docs.microsoft.com/en-us/azure/bot-service/bot-builder-authentication?view=azure-bot-service-4.0&tabs=aadv2%2Ccsharp%2Cbot-oauth - Add authentication to your bot
- https://docs.microsoft.com/en-us/microsoftteams/platform/concepts/authentication/auth-flow-bot - Authentication flow for Bots in Teams
- https://github.com/microsoft/botframework-solutions - Bot Framework Soluitions - open source examples
- https://github.com/microsoftgraph/msgraph-sdk-dotnet - MS Graph SDK for .NET
- https://docs.microsoft.com/en-us/azure/bot-service/bot-service-manage-channels?view=azure-bot-service-4.0 - Connect a bot to channels
Conclusion
Connecting together bot, Microsoft Teams, and Microsoft Graph is not a rocket science. But it takes time and consists of pretty big number of steps, including configurations as well as coding.Hopefully, this post will help to proceed with all the steps in correct order with ease.
That's all for today!
Have fun!
Comments